DOC’S EMPHASIS-
It must be obvious by now that Doc has changed his emphasis from the White Systems- WhiteRifles line of his in-line muzzleloaders to custom traditional percussion and flintlock guns, which is where he started 60 years ago. The White companies have been financial failures for the most part, with great inventions, terrific developement, and innovative products with superb functional elegance, ergonomics and quality. But the management could never rise to the quality of the product. In the end, teaching a new doctrine was just too expensive. The current company, WhiteRifles, is a small remnant of what went before. Parts and bullets are still available, but there hasn’t been a new design, let alone a new rifle, produced since 2005.
If you want to see what Doc does best, at present, look under ‘custom traditional‘ found top of page. If you want top see what Doc used to do, look up the old White Systems, also listed top of page: G-Series rifles: the Whitetail, M97. The GS-series-the Lightning, The BG shotgun-the Tominator, The S-series: the Super-91, Super-91-ll, M98 and Thunderbolt.
KNOCK DOWN POWER and whitetail deer
 Here I am with a White Super Safari in 504 caliber, shooting a 600 grain Super-Slug over 120 grains Pyrodex-P. Range was 170 yards, shot was taken offhand. The bullet ranged from high on the right rear ribs, forward and down through the huge vessels of the heart and lungs for an instant kill. The bullet expanded to about dollar size, traveled through nearly three feet of moose before coming to rest in the muscles between two ribs far forward on the bull’s chest. The bull fell with the impact of the bullet and never wiggled. This is a good example of how effective a bigger bullet can be. Below are the ballistic reasons why bigger bullets are so effective.
Ever wondered why bigger bullets slam your game to the ground like they do? Ever wondered why the game shot with short lightweight pistol bullets run a good ways before they finally keel over? I’ve not only been hunting myself for the last 60 years, but have watched as hundreds of game animals have been shot by other hunters. Almost always, they were shooting one of the popular 45 caliber, 250 grain pistol bullets in a 50 caliber sabot. Few animals were slammed to the ground. Most jumped with the hit, then ran off, only to fall later, many times a lot later. Many were not recovered. Let’s examine the reasons why.
For this experiment, I prepared three rifles with three different loads. The first, illustrated as Trace 1 below, in red, is a 50 caliber rifle loaded with a Hornaday .452 XTP hollow point bullet weighing 250 grains, Ballistic Coefficient (BC) 0.140 and three Pyrodex pellets, that’s 150 grains black powder equivalent.
The second, illustrated as trace 2 below, in green, is a .451 caliber rifle loaded with a White brand 45/40-350 PowerStar, that’s a 40 caliber hollow point bullet weighing 350 grains in a 45 caliber sabot, BC 0.300, fired with 110 grains of Pyrodex P.
The third, illustrated below as Trace 3, in blue, is a 50 caliber rifle loaded with a White 460 grain PowerPunch slip-fit bullet, BC 0.26 and a modest load of just 100 grains of 777.
We are going to study VELOCITY, ENERGY, DROP, PATH and MOMENTUM of the bullets as they relate to knock down and killing power.
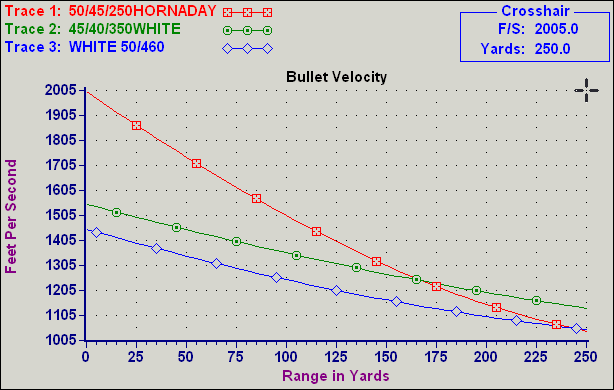
VELOCITY- In this modern world, velocity seems to be awfully important. Didn’t Roy Weatherby prove that back in the 50’s? So let’s look at it first. Goodness, the Hornaday 250 grainer in trace one (in red) starts out at a terrific 2005 FPS,almost as fast as a 30-30 Winchester. The 350 grain 40 caliber bullet (in green) in the .451 rifle only gets 1550 at the muzzle and the heavy 50 caliber 460 grain PowerPunch bullet (in blue) starts out at a lowly 1450 FPS. Looks like the Hornaday would be the winner, except that it rapidly loses velocity, meeting the other two in the1200 FPS range way out at roughly 175 yards.
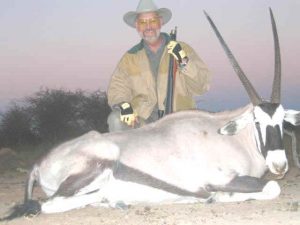 Randy Smith, 2004, South African mountains with nice Gemsboc and White 504 caliber SuperSafari rifle, shooting 120 g.r Pyrodex P under a saboted White 50/45-435 PowerPunch bullet, BC 0.290. 140 yards, the Gemsboc down with the shot, the bullet breaking down the front shoulder, catching both lungs and top of heart, a perfect example of a well placed bullet taking out multiple vital organs in a large, elk sized, tough animal..
ENERGY: Most of us know that a light bullet that loses velocity rapidly will lose energy even faster. Let’s see how the same loads as above perform with energy.
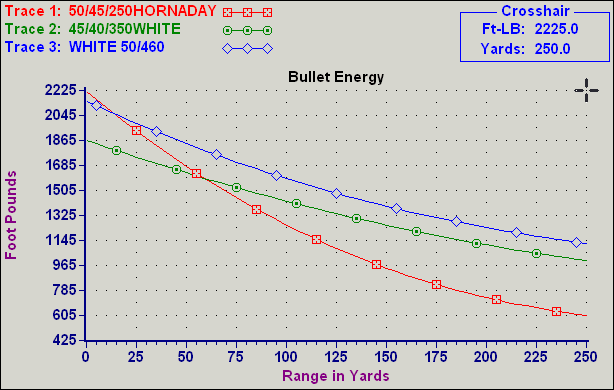
ENERGY- Obviously, all the loads start out with nearly or somewhat more than 2000 ft lbs at the muzzle. The Hornaday 250 grain bullet starts out with 2221 ft. lbs., the 40 caliber 350 grain PowerStar shows 1868 ft. lbs. and the 50 caliber 460 grain PowerPunch demonstrates 2148 ft.lbs. However, within 60 yards, the lighter 250 grain bullet has fallen below both the others and is substantially lower at 100 yards. At 200 yards, it has only 734 ft.lbs. left, a relative disaster when compared to the other two, both of which have better than 1100 ft. lbs. of energy remaining.
QUESTION: But doesn’t the higher velocity of the 250 grain bullet in trace one give the hunter a real advantage? Shouldn’t the holdover be far less and the shot far easier to make with the higher velocity bullet. No? But, isn’t it this factor that we see advertised by most muzzleloading companies in their new “high velocity” rifles, loading three Pyrodex Pellets and a light , short Pistol bullet.? Let’s compare the three bullets and loads in the chart below to see just how good, or bad the total bullet drop is, relatively speaking.
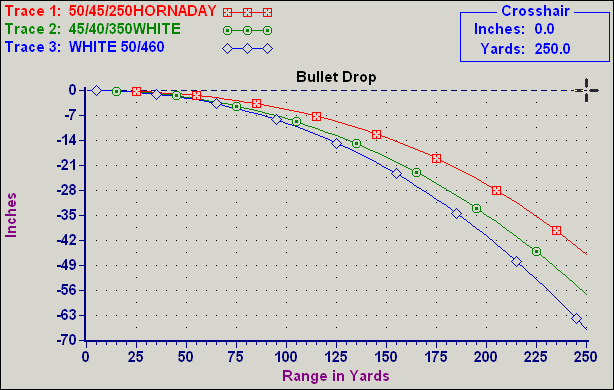
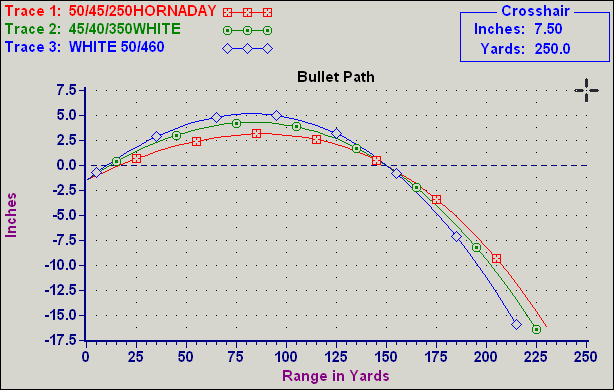
DROP: The short Hornaday has the advantage all the way out. It falls only 5.28 inches at 100 yards while the other two drop 7.93 and 9.18 inches at 100 yards. At 200 yards, the difference is even more pronounced, with the 250 grain bullet falling about 26.32 inches and the heavy 50/460 falling about 40.72 inches. But hey, this is pure fall, with no adjustment for point of aim. Let’s adjust the rifles now so that they are all sighted in at 150 yards.
The rifles are now sighted in at 150 yards. The chart below will show us just how much hold under or over we will need at any specific range.
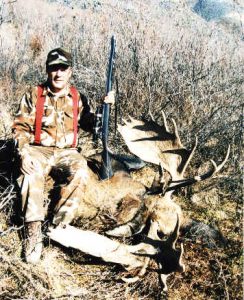
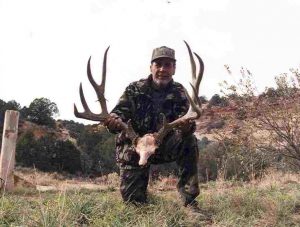 Bob Johnson 1992 with a 240 class mule deer from Utah’s Pahnsagaunt, 200 yard shot with a .451 caliber White Super-91 using 90 gr Pyrodex P and a 460 grain slip-fit .450 PowerPunch bullet, BC 0.330.
PATH: Looks like there is a whole 2 inches difference in apogee between the fastest load and the slowest, the 250 grain Hornaday shooting 3.05 inches high at 75 and 100 yards, while the 50/460 PowerPunch shoots 5.1 inches high at the same range, with the .451 in between. At 200 yards, the shooter would have to hold 8.17 inches over point of aim with the 250 grain equipped rifle while the holdover with the 50 caliber, 460 grain bullet would be 11.21 inches and the 45/40-350 in between at 9.42 inches. That’s not enough of a difference for the average eye to even see with open sights at 200 yards and would make the difference between holding low on the spine or high on the spine for a heart shot on a small Texas Whitetail if you had a good scope and a steady rest. If no rest, a good breeze, open sights or you are a lousy shot like most of us, it makes little difference.
MOMENTUM: It becomes obvious from the chart below that the heavier bullets have a decided advantage in energy, which roughly equates to killing power, at extended range,(although not within 50-60 yards), while the lighter 250 grain bullet has a miniscule advantage in holdover out to 200 yards. Holdover has little to do with killing power although lesser holdover makes the target easier to hit.
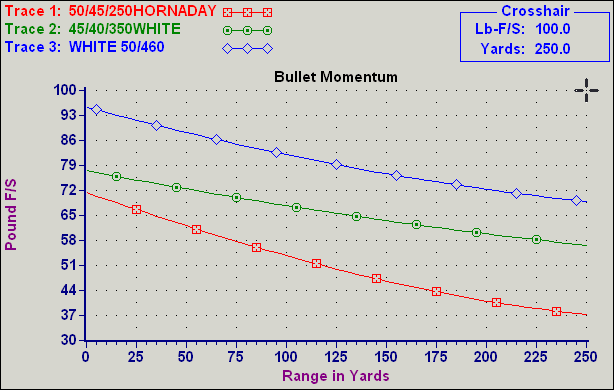
The big factor in knock down or killing power is not just energy, but is a combination of bullet weight, bullet diameter and velocity. The old Taylor Knock Out (TKO) formula (Bullet weight in lbs. times diameter in inches times velocity in ft. secs. divided by gravity in ft. secs.) yields a constant which compares the effectiveness of various bullets. The Momentum chart above approximates the TKO formula (although not the absolute numbers).
Obviously the 250 grain pistol bullet comes out a poor third. This is briefly explained by the poor 0.140 Ballistic Coefficient of the bullet, while the PowerStar 40 caliber 350 grain bullet has a BC of 0.30 and the PowerPunch 50/460 a BC of 0.26.
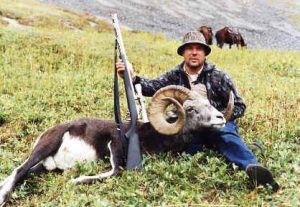
Jeff Winn, Canada, 1991 with record book Stone Sheep, #1 muzzleloader that year, with White Super-91, 451 caliber using 75 grains Pyrodex-P aand a .450 caliber slip-fit 490 grain PowerPunch bullet, a neck shot at 175 yards. He claims he took the neck shot on purpose. Such confidance!
The lightweight Hornaday 45 caliber 250 grain bullet scores a relative number of about 40 on the above Momentum chart, while the 45/40-350 PowerStar scores about 60 and the ‘slow, lumbering’ 50/460 PowerPunch comes out with a number close to 72 at 200 yards. In other words, the 250 grain bullet is only 55% as effective as the big PowerPunch and 66% as effective as the PowerStar at 200 yards. Even at 50 yards, there is a substantial difference.
Well, the reasons the heavier bullets are slammers while critters run off with light, short, poor BC hollow point pistol bullets should be obvious from the study above. Not only do those light bullets lack the energy to penetrate. but they also over-expand because of the wide hollow point which makes penetration even worse. Let’s remember that the bullet’s job is to destroy not just one, but multiple organ systems in its way through a game animals body. You want to plant a bullet of adequate velocity and weight at just the right angle to virtually guarantee a sudden plunge in blood pressure and flow, so that vital brain and body functions cease virtually immediately. That’s what knock down power does for you. It puts the animal on the ground where it can’t run off or run at you. A wounded whitetail might give you a second chance, a wounded cape buffalo surely will, not that you will like it.
So what would I use for whitetail? I most surely would not use a short, low BC hollow point 250 gr. pistol bullet in a sabot. If I am forced to use such a bullet, I would want it to weigh at least 300 grains, simply because those heavier bullets are made for higher magnum pistol velocities and they penetrate better in big game.. A 300+grain pointed bullet is even better because the BC will be higher. I would use the powder charge that gives me not the highest velocity, but the best accuracy, simply because it won’t matter what the BC, or the Energy, or Velocity or Drop or Momentum is if you can’t get the bullet into the boiler room.
There are a number of 300+ grain bullets available. The Hornaday 45 caliber 300 grain in a sabot is a good one except for the blunt nose. The Harvester 45 caliber 300 grain spire point is excellent with an enhanced BC , especially with their ribbed sabot. There are others as well. Federal has just come out with a 350 grain non-saboted bullet in 50 caliber. Even heavier all lead and copper coated bullets with plastic skirts are common. Experiment with them in your rifle until you get the combo you like. Nothing works better than lots of shooting to refine your loads.
 What do I use personally on whitetail? A White brand ThunderBolt in .451 caliber with a saboted White 45/40-350 SuperStar bullet (45 cal. Sabot, 40 cal. Bullet weighing 350 grains) over 70 grains 209 blackhorn powder with a 5 grain black powder igniter. Muzzle velocity 1700 FPS, sight in at 140 yards, 200 yard holdover 6-7 inches, 200 yards group 3-4 inches. Above: 2015 whitetail kill 180 yards, heart shot, deer traveled 6 feet.
Good Hunting
DOC
SO YOU WANT A LONG RANGE MUZZLELOADING SPORTING RIFLE-
BUT: You haven’t got the bucks to buy one outright, at least not one of the elegant custom sporting rifles that you see on this website with Doc’s signature on them, or any other well known builder for that matter.

You don’t want an in-line, you want a traditional rifle that might pass muster at a rendezvous if it had to but what you really want is a rifle that will shoot accurately and powerfully at 200+ yards and take down that big whitetail buck you’ve been dreaming about.
How about a simpler, less expensive rifle, like the one above, that shoots every bit as good as the costly ones. Still sports quality parts, just fewer of them.
THE ANSWER: to this dilemma is to build one yourself. You have to remember that the elegant reproduction sporting rifles that sell for big bucks nowadays are copies of elegant sporting rifles that sold for big bucks back in the old days, too. There were lots of equally well performing rifles that cost a lot less money back then, too, so building a less expensive one is still traditional and , best of all, just as effective as the fancy ones. They even look somewhat alike, except for a few details.
THE DETAILS: You will need a barrel, lock, stock, drum and nipple, trigger , trigger guard and buttplate, pipes for a ramrod and the ramrod. A set of sights will help, too, plus a few screws and bolts and 1/8th inch welding rod to hold it together.
You will also need a few basic tools, or access to them. A buddy with a shop and tools, a local gunsmith willing to provide drilled and tapped holes and sight slots, even taking a hobby class where the tools are available at your local high school or college.
Here is a list of the parts you will buy, the total bill should come out somewhere around $500. All parts mentioned are excellent quality. We want less expensive, but we want quality, too. Don’t scrimp on the quality of the parts, just on the number of them.
Barrel; the best caliber is .451 with grooves .035 deep and a 1-18 to 22 twist. The reason is that this caliber and twist duplicate a 45-70. Such barrels are easier to find or have made because of the popularity of the 45-70. The least costly shape is round and no more than 1 1/8 inch diameter and 30 inches long, and inch in diameter is better, far easier to carry. The best source is a barrel maker who can install the simple flint breech plug, drum and nipple while he is at it. I use Howard Kelly, who has been making barrels for 50 years and is a master. He is also less costly than Douglas or other modern barrel makers- buy one of those and you have to get a smith to pare down the barrel and install the breaching at extra cost.
A few of you might yipe about the drum and nipple but I find it the best, yes I said best, breaching arrangement there is for a muzzleloader carried on an all important hunt. Reason is that you can pull the drum and nipple out with a small wrench easily if something screws up. You can’t do that with a patent breech, only screw out the nipple and hope you can fix it without having to screw off the breech, which takes a shop , a vise and the proper tools.
Stock– either start with a plank, saw out the outline then peel off the extra wood with a rasp or buy the stock pre-carved. I advise you to buy the stock pre-carved. I use Pecatonica River Long Rifle Supply but there are others. Order their English half stock shotgun stock in maple or walnut. Walnut is a little easier for beginners to handle so get their least expensive grade of walnut, or soft maple. Ask them to cut a half round barrel channel to fit the barrel you have and a ramrod hole to fit your 3/8″ ramrod.
Lock– you will want a lock with a cut for the drum and nipple ready-made. The best is a lock made by L & R. Many supply houses carry it, it is their #300. The lock has a flat spring, quality is excellent and it has a fly on the tumbler in case you opt for a double set trigger somewhere down the road.
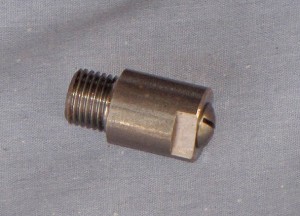
Drum and nipple: buy a ½ inch drum with 3/8 x 24 threads and a clean out screw but without the nipple. Buy the stainless 1/4 x 28 nipple separately. You will want to drill and thread for it only after the drum is installed. Best: have your barrel maker install the drum while finishing the barrel. Track of the Wolf labels their drum: Drum-8-5-FL
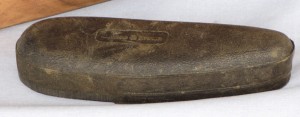 ButtPad: buy an inch thick rubber buttpad at least 5 inches long. You can find one cheap on Gunbroker.com. I bought 8 of them recently for less than $8 apiece. Brass or steel buttplates are much more expensive and much harder to install. Make the job easy and less expensive with a rubber pad. Besides , the English were putting pads on Sporting rifles before our Civil war.
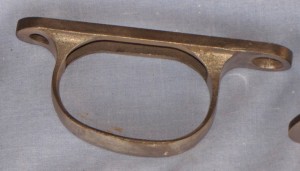 Trigger Guard: Traditional trigger guards in brass or steel are expensive, about $30. Find a simple trigger guard that will do the job, like the trigger guard from a White Super 91. There are lots of them still available. Any other similar guard will do. I you want the pricey one, order T/W’s TG-Express-1 in iron, it’s a bit less expensive than brass.
Under-rib: the under-rib carries the pipes that fit the ramrod. They also separate the romrod from the barrel a sufficient distance to fit keeper and key under the barrel. T/W calls theirs Rib-TR-16-20.
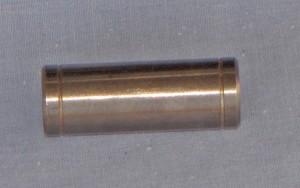 Pipes; You will need two. They are easily made from 3/8th inch tubing, but since you will have to buy a full length of tube it’s just as cheap to buy two simple pipes. You going to solder them to the rib. T/W calls theirs RP-RH-RH-6-I. All muzzleloading supply houses carry these simple pipes.
Ramrod: Buy a 3/8″ ramrod with brass tip installed. Everybody carries them. Used to be they were all hickory. Now there are even better woods. If you want , get a Delron rod, but you will spend three times the money. I don’t recommend them, they are too wobbly for a long barrel.
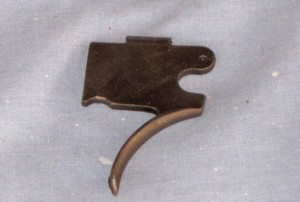 Trigger: The simplest trigger is pinned through the wood of the stock, without a trigger plate. A trigger with a plate doubles your cost. You can always go for a more elegant trigger, even a double set trigger, later one. I would start with the simple one, substitute the fancy one later if wanted. Many styles are available. The best for this application is the ‘Gibbs’. T/W’s label is TR-Gibbs-T.
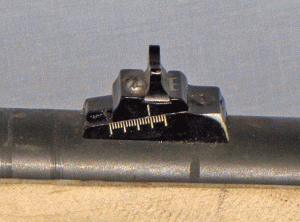
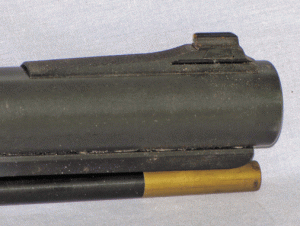
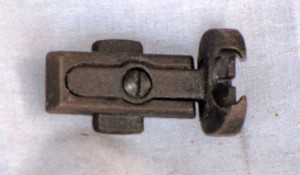 Sights: Here is where spending a little more is worth it. You can’t shoot any better than the sights will show you the target. I would opt for an adjustable rear and a hooded front. T/W’s best adjustable is their RS-PM-1, the best front is Lyman’s lowest hooded front with inserts, T/W calls it FS-17-AHB. Both will need dovetails cut into the barrel.
Finish– get a small bottle of pine oil. Linspeed is also useful as is LMF’s gunstock varnish, if you are going to finish traditionally. You will also need a small bottle of Birch-wood Casey’s Brown. Of course, you can always just paint the whole thing black with grey-black auto primer underneath.
LET’S BUILD IT
Start by inletting the barrel and tang
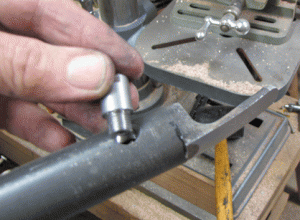
The barrel should have the tang and drum drilled, tapped and screwed into place.
 Here you see the tang and drum screwed into place. Be sure they are square to each other and that the sights line up with the tang. The tang will be rounded and bent to fit the stock during inletting.
The stock should have the barrel channel inletted, at least close. Finish inletting the barrel, including squaring up the corners of the recoil shoulder at the breech. This is done easiest by turning the barrel around and using the muzzle to make sure everything is square.. Use inletting black and a SHARP chisel.
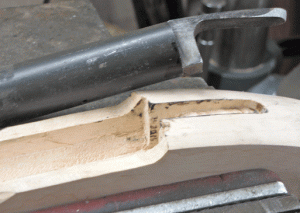 The barrel and tang have been inletted, the tang cut to length and rounded bent to fit the countour of the stock. You can see traces of inletting black in the inlets.
Once the breech is inletted squarely, inlet the tang. Again, use the inletting black. You can do the preliminary inletting with a Dremel tool, then use that sharp chisel to finish the sharp corners.
Finally, file down the tang to match the contour of the wood. Drill a hole in the tang 5/8th of the length of the tang back from the barrel, centered in the tang for the 1″ x #12 screw that holds the tang in place. Countersink the screw hole to fit the head of the screw. Drill a .125″ hole in the wood and screw in the screw. Grease it lightly before you screw it in.
Inlet the drum
You had removed the drum before inletting the barrel. Now screw it back into place and inlet it into the stock. A Dremel tool with 1/4″ bit works fine here.
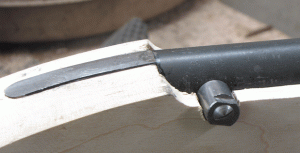 Barrel, tang, drum inletted. No tang screw yet.
Fasten the barrel to the stock
Now remove the screw and remove the barrel from the stock. You are going to make a pin keeper from 1/8th inch steel copper coated welding rod. This is the part on the underside of the barrel that accepts the pin that hold the barrel to the stock. This is easily done by bending and hammering the rod around the jaws of your vise grip pliers. You should end up with a ‘U’ with squarish coiners. The legs should be 1/4″ long on the inside of the ‘U’. Mark the underside of the barrel 5/8th of the way from the front of the lock mortice to the end of the forearm. Make sure the marks are in the middle of the underside of the barrel. Now mark the barrel to accept the “u” you made, so you can drill a 1/8th X 1/8th holes to accept the legs of the loop. Peen the ‘U’-shaped keeper into the holes, then remove it. Apply soldering paste, then replace the loop in the holes and solder permanently into place with Force 44 silver bearing soft solder, (25,000 lb. tensile strength). Allow to cool while you are inletting the stock for the loop you just soldered.
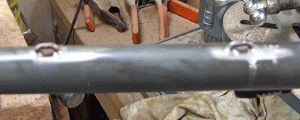 The loops are peened and soldered into place
Now drill a 1/8th” hole from side to side in the forestock, centering the keeper in the barrel. This is best done by measuring and marking the position of the middle of the keeper on the stock, then using a caliper to measure the distance from the top of the barrel channel to the bottom of the channel, then marking that distance on both sides of the stock.
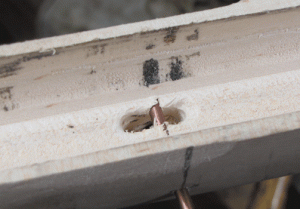 The slot for loop with pin in place.
Now drill from one side to the other- place your finger tip where you want the drill to come out then try to hit the middle of the finger tip with the drill. Practice this technique on scrap wood several times before you make the real attempt. Now cut a piece of the 1/8″ welding rod , trim up the ends and drive through the hole you just drilled with barrel in place.
If you want a double pin set up, then make two of the loops , drill and solder as instructed but place the two pins equidistant, measuring from the front of the lock panel to the tip of the forend.
Then inlet the lock
First take the lock apart. You will start inletting with the lockplate. Put it into place with the cutout for drum in place surrounding the drum. Mark with a pencil, then remove the wood. I do this with a dremel tool but others use a sharp chisel, The cutout should be the depth of the lockplate, or deeper, deep enough that the thicker bolster on the lockplate fits up against the barrel.
Once the lock cutout is roughly done, smear inletting black around the edges of the plate, replace it in position and lightly tap with a wood or rubber mallet or the wood butt of a hammer. Then remove the blackened wood. Repeat this maneuver until the lock plate s fits precisely.
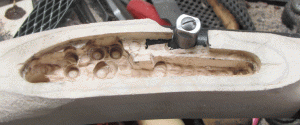 Wood had been removed so that all parts fit and function.
Now screw the tumbler and bridle onto the lockplate. Mark the wood and remove the wood with Dremel tool or chisel. Mark the piece with inletting black , attempt to put the plate with parts into place then remove the blackened wood.
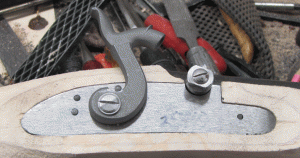 The lock is completely inletted with hammer correctly positioned.
Continue until inletted with the tumbler moving freely within the inlet. Now do the same with the sear spring, sear, and mainspring, in that order. All parts should move freely in their inlets once done.
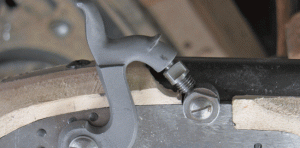 The lock is inletted, it fits and it functions. The photo shows the easy way to mark the drum for the nipple.
Now replace the hammer, use the nipple to measure where the nipple hits the drum, then mark. Drill and tap the drum for the 1/4 X 28 nipple. Screw in the nipple and make sure everything fits and that the hammer hits the nipple squarely.
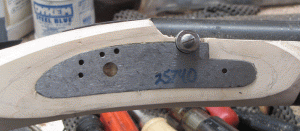
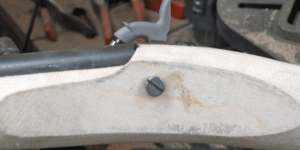 The bolt can be left as is, it works fine that way. Fancier rifles would have a decorative escutcheon under it.
The last step is to secure the lock in the stock with an 8 X 32 bolt. Drill the plate first, placing the hole at the rear of the bolster, then drill the stock from side to side using the same drill bit, then drill for the bolt using a drill large enough for a little wiggle room, then tap the plate. Be sure to use the proper size drills, first the smaller tapping drill then the larger bolt drill. Trim the bolt to fit.
Then the trigger and trigger guard
Now measure the trigger against the location of the sear. Do this with the lock removed from its inlet. Place the trigger so that the sear hits the trigger about 2/3rds to 3/4’s back. Mark the opening in the wood needed to fit the trigger.
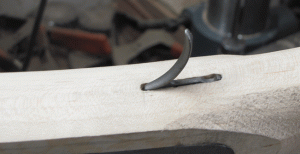 The trigger needs to move freely in the slot.
The inlet needs to be just a touch generous so the trigger moves freely in the slot. Now cut the slot. This is done easiest with a Dremel tool and 1/8th inch bit, but you can use a drill and narrow 1/8th inch chisel just like the old timers did. The slot needs to be deep enough to fit the entire trigger with the trigger and sear touching.
Once the slot is cut, replace the lock, then trim the trigger to fit both slot and sear. Now drill a 1/8th “ hole to pin the trigger in place. This hole goes in the front, upper end of the trigger, which provides the best leverage. It is best to measure for position, mark the hole, drill the hole in the wood from side to side, then place the trigger in position and mark with the drill, remove the trigger and finish drilling the trigger. Then replace the trigger and pin with a short shaft of 1/8th inch welding rod. Now try the trigger, make sure it moves freely and trips the sear without binding.
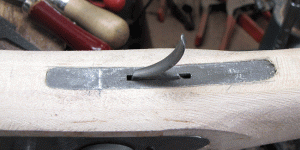 I had a left over trigger plate so decided to add it to the rifle. It adds about$8 to the cost.
Now inlet the trigger guard. Center it around the trigger, make sure the trigger fits in the rear third of the guard and that it moves freely. Trim the trigger if you need to. Scribe a line around the trigger guard then remove the wood. Use inletting black to get it just right.. Once in place , mark and drill 1/8th inch holes to fit the 1″ x #10 screws you will use to hold the guard in place.
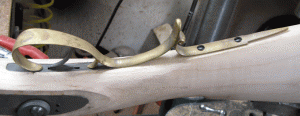 This brass trigger guard was also a leftover with no other projects in mind. It adds a substantial $30 to the cost. Iron would have been $5 cheaper and stronger to boot.
Now put on the buttpad
First you have to cut the stock to your length of pull. Most modern men can use a 14 inch pull, but adapt the length to your best comfort. Measure from the trigger back 13 inches, or whatever your pull is less one inch, then mark and cut the buttstock at right angles to the top line of the comb of the butt. Now square up the cut using a rasp or sand on a belt sander and screw on the rubber buttpad. It will be way too big.
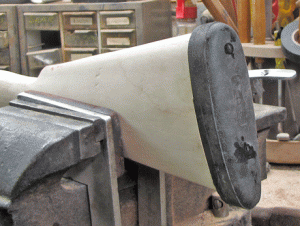 You can see the recoil pad is oversize
By the way, leaving off the buttpad saves money and is perfectly traditional. One of the finest guns I ever saw had a checkered butt, no pad, no plate, no nothing except fine stock wood and good checkering. Contrasting wood butt plates were also used, like walnut on maple or vice versa.
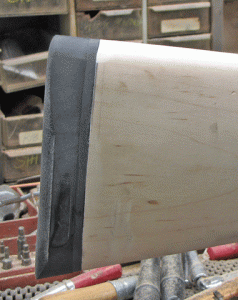 Now the pad is firmly screwed on and sanded down to fit the wood. You will need a grinding belt for this job and you will need to do it slow and careful to avoid dinging the wood.
Sand the rubber buttpad to fit the stock contour on a belt sander with a coarse grit belt. Be careful not to sand off any wood. Putting some masking tape on the butt stock helps you to avoid sanding gouges.
Then install the rib, sights and lugs
The first step is to solder on the pipes. Silver solder works quite well but so does silver bearing soft solder which 3-4 times as strong as ordinary soft solder. Position the two pipes equidistant from the forend to the muzzle. Make sure you have trimmed the forestock to the length you want.
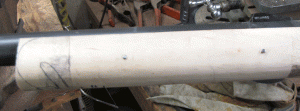
The under-rib is fastened with three 6 X 40 screws. The pipes have been silver soldered, using the lowest temperature silver solder I could find.
This distance is usually about 3/8’s of the distance between the tang and the muzzle, maybe as much as 3/8’s and a half- IE- 7/16″. The rib should butt up against the wood of the forend tightly and extend to within about 1/4″ of the muzzle. You can either soft solder it on or fasten it with 3-4 screws. The soft solder is more traditional, the screws more modern. Both work, both are about the same amount of fuss. If you use solder , use the silver bearing solder I mentioned, it’s stronger. Also, be sure to hold your pipes in place if they have been silver soft soldered as the heat will melt their solder, too. This is not a problem if the pipes have been silver soldered as the silver solder has a far higher melting temp. than the silver bearing soft solder.
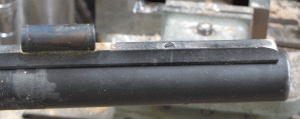 You can see some dross in front of the pipe from the silver soldering job. You can also see the screw. The end of the rib is a touch shorter than the barrel, to fit a cleaning jag on the ramrod. It is also rounded so it doesn’t catch or scrape the ramrod.
If you use screws , use 6 X 40 machine screws, the finer thread is stronger. Once the rib and pipes are in place, run the ramrod in. Probably it will be a bit too big. Trim and sand it down to fit and cut to length.
The best ramrod will have a brass end drilled and tapped for accessories inside with a cleaning jag on the other outside end. Use the cleaning jag as a handle to grip the ramrod when you pull it out of the pipes. Don’t reverse it to ram the bullet, that just wastes time. Pull it out, ram the bullet put it back without ever removing your grip on the jag. Makes loading much faster.
Now shoot it
By this time, you should know what sights you want. Put them on with screws or in dovetails as indicated. Be sure you get them exactly in the center (the very top) of the barrel. Canted sights not only don’t look good but they don’t shoot where you want them to either.
The rear sight on this rifle is an adjustable by Marbles. It screws on. The front is a ramp with insert by the same Co., also screwed on. They were used because the barrel was already tapped and drilled for them.
Now take the rifle to the range and shoot it. You will want to discover if the gun functions as designed and how well it functions and shoots. You may want to adjust sear and/or trigger, and most surely the sights. Sight it in, at least close. Fire lap it if you want or need. When finally adjusted, you should be able to plant three bullets into 2 inches at 100 yards and into 4-5″ at 200, or better. I have seen many 2″ 200 yard groups. Once you are satisfied with your trial, clean the gun and get ready to finish it. See my article on accurizing the muzzleloading rifle, in Doc’s Books, under The White Muzzleloading System.
Then finish it
Polish the barrel on a wheel or use progressively smaller grits of Emory cloth to at least a 320 grit finish, then brown. I use a propane torch, heat the metal until the solution slightly sizzles on it, then repeat the treatment 6-8 times, cleaning the residues off with water and a slightly abrasive fluff between coats. Once you have rasped then fine filed the stock to shape, sand with progressively finer grits from 80 to 400 until smooth and slick. Apply stain if wanted. Alcohol based stains are easiest. Then soak with several coats of pine oil and let dry. You can follow with a gunstock varnish or not. Or just spray it with a grey auto primer then a final coat of black or other auto finish. If you want a pebbled finish, use auto undercoat. Spray it from a distance, use several thin coats.
The rifle is assembled and ready to shoot (and to hunt with, if you choose). All that’s left is the finish. That can be as simple as a can of spray paint. Auto finishes are best, with a primer under coat.
and go hunting
The is the best part. What you have constructed will kill a whitetail at 200 yards with ease, as long as you can hold the gun and see the sights and target at the same time. Last year I used a similar rifle in .451 caliber with a saboted 350 grain bullet over 70 grains of 209 Blackhorn powder with a 5 grain black powder igniter to pop a big whitetail at 180 yards. Targeting this 1700 FPS load had shown that sighting in 3″ high at 200 yards put the bullet 6-7″ low at 200 with three inch 200 yard groups. The buck was fighting with a smaller buck, stepped back for a moment just at dusk. The bullet took the big aorta off the top of the heart. He didn’t go 6 feet, whirled around and went down. You can do it, too!
Good Hunting
DOC
PS- This adventure isn’t over. I am building another one of these. I will post photos and description as it grows up. DOC
BLACK MAG POWDER
Back in 1994, I ran into Tony Chiofffe at the SHOT show. He was promoting his new Black Mag replacement powder , an ascorbic acid based powder that looked for all the world like a handful of sand. I shot some and fell in love with the stuff. In 1995 I killed 12 head of big game with it, all deer size or larger and including a huge moose at 170 and a big caribou at 250 yards. Unfortunately, Tony’s health was bad and he died before the product could be fully developed in the market. Black Mag disappeared for a few years but has finally resurrected. I have been shooting it again lately and it appears to be every bit as good as it was originally.
The powder is sandy looking, not black like we all expect, about FFFg size and pours freely out of a measure. I was shooting 80 grains of PyrodexP and fffG 777 a few weeks ago, with a 504 caliber M97 Ultra Mag equipped with 26 inch barrel, loading it
under a 460 grain Power Punch bullet. This rifle is particularly accurate with its Leopold 3 X 9 scope. I was shooting rocks, as the red rock cliffs around here offer a great place for marking bullet placement at long range. The hits are plain to see against the red background, a lighter splash on the rock surface, which weathers and fades back to red within a year. It’s a great way
to teach yourself long range distance estimation without using a range finder. Pick an elk sized rock, estimate the range and drop of the bullet, pick a heart sized target on the rock, then try to hit it. I was shooting up to 400 yards
with most shots at 200-250 yards. It was pure fun.
I could tell very little difference between the three powders, shooting them interchangeably. One seemed to be as good as the other. All shot into the same group as the others. It was as easy to hit an elk’s heart at 200 yards with one as with the other. The 777 seemed a touch more potent than the PyrodexP and the Black Mag a touch more potent than the 777, judging from the recoil (I left the chronograph home) but the practical results at the distances I was shooting were effectively the same. I did not clean the rifle the entire afternoon until the shooting was over. Neither did I pick the #11 nipple or shift the breechplug
during the shooting session. The bullets loaded easily, one finger on the ramrod with all the powders, but the Black Mag would clean out the harder residues from the other two with a shot or two. Where usually a hard crud ring develops with long shooting strings using Pyrodex and 777, the crud ring was blown away with the Black Mag.
The real difference was in the cleaning. I purposefully shot a string of shots using just the Black Mag to finish up the shooting session, wanting to know if it cleaned as easily as it originally did. I was not disappointed. I usually clean a barrel dirtied with Pyrodex or 777 with 4-5 patches wet with my blue SuperClean then follow with 4-5 dry patches, ending with an oiled patch.
The Black Mag dirtied barrel cleaned with fewer patches, taking only three SuperClean wetted ones before going to dry patches. I don’t think the Black Mag is any more soluble in water and alcohols than the others, but I do believe there was less residue, thus a little easier cleaning.
I am delighted to see Black Mag back. I have no idea what the stuff costs or how widely available it is right now, but I can testify to how well it shoots and cleans. Of all the powders I have ever used, it burns cleaner and shoots better long strings than any other as the residues are so much less. I still need to get it on the chronograph and also do some true accuracy testing, but
for general hunting: ie- taking out an elk’s heart at up to 250 yards, it’s fine stuff, easily as good as the other two.
A quick note on Pinnacle and American Pioneer powders. The folks at Goex were delighted that I was interested in Pinnacle and arranged to send some for testing in White rifles. American Pioneer was another matter. They could have cared less, insisting that all the research needed was already done. I suggested that a recommendation from me might be a powerful argument for a shooter to buy it but just got a horse laugh at that egotistic sally. I will report on Pinnacle as soon as I get some. American Pioneer will wait until the company is a bit more co-operative and not afraid of independent research.
Good Hunting
DOC
PS- i’ve been using Black Mag to accurize barrels for a while now. I am even more impressed with it. It cleans so easily! And it is very accurate with PowerPunch bullets. DOC
209 PRIMERS IN W-SERIES RIFLES
There has been considerable interest on the part of some shooters in switching the #11 cap usually found on W-series White rifles (Super91, M98 Elite Hunter, Super 91-II) to 209 shotgun primer. I have never been a great advocate of the 209, usually preferring a musket cap for my own hunting because of its speed of removal, so have been pleasantly surprised in the
last few weeks while working with a pre-production 209 kit in a new .504 caliber Super 91-II. The surprise comes from several fronts as I had not expected such good results as I got.
The first surprise was that the 209 primer stayed in the primer pocket of the White 209 Breechplugwith every shot. The second was that none were blown to pieces. I had gone to the range prepared with hat and safety glasses expecting that primers or pieceswould be flying close by with every shot. I attribute these surprises to the good design of the breechplug, which after considerable trial and error has evolved into its present form. The primer pocket holds the 209 primer firmly in place due to the double wound spring wrapped around the hex head, There is also a double pressure release hole drilled through from side to side. This allows excess gases to escape to either side rather than blowing the primer out of the pocket. Another surprise was the ease with which the 209 came out of the pocket after firing. It took a fingernail, but the first three flipped out easily, almost by themselves. (And who gets more than three shots on a hunt?) After a dozen shots, it took two fingernails but still came out easily enough for casual shooting. The lesson here is to keep that pocket clean for the first shot of a hunting day, if for nothing more than to speed up the second shot if needed.
Another surprise was the consistant accuracy of the rifle. I used two loads, 70 grains of 3fG 777 and a 460 grain PowerPunch bullet and 100 grains of Pyrodex Pellets (that’s 2 each 50 grain pellets) and the White 320 grain saboted hollow pointed Shooting Star.I used the Remington 209-4 primer made for the 410 shotshell or the CCI Trap & Skeet primer in all loads. I have found that these primers are by far the most consistent from load to load in White rifles. Unfortunately, Remington has stopped making the 209-4. Other stronger 209 primers have not been nearly as consistent.
I was not terribly surprised by the accuracy of the 70/777/460PowerPunch load as it is almost universally accurate in White rifles fired with #11 or musket caps. But I was very pleasantly surprised by the 2 Pyrodex Pellet/320 grain Power Star load. I had saved some 50 grain Pyrodex pellets since last fall, leaving the box open to the air, but in a high, dark, dry place, to promote aging. I had intended to see how badly they shot, since prior experience with aging pellets had been adverse. Lo and behold,
the load shot into 4 inches at 150 yards with open sights and my old eyes. Maybe I was just lucky but maybe Hodgden has solved the pellet aging problem.All previous experience had been with #11 or musket caps. Anyway, I was extremely pleased with the results.
I also discovered that the combination shot very much like the same load in a White Thunderbolt rifle. The large amount of flash from the 209 primer in the short White breechplug promotes faster burning of the powder, higher pressures and higher velocity. I was impressed that the same rules promulgated for the ThunderBolt apply to the 209 in a Super 91 or M98. That is, you won’t need as large a powder charge to get the same performance as with a #11 or Musket cap. You also will do better with
heavier grained powders, like Pyrodex Select and 2Fg 777 rather than PyrodexP or 3Fg 777. Pyrodex pellets also work well as long as you use a saboted bullet. Work up the load from 70 grains in 5 grain increments until you get the performance and accuracy you want. it’s rare to need more then two Pyrodex pellets with a White bullet, even for the largest elk or moose.
I was originally quite surprised at how much the 209 enhanced performance. I previously had been unpleasantly surprised at how full power 209 primers degraded accuracy. It was only after switching to Remington 209-4 primers, made for the 410 shotshell, that accuracy returned to normal levels. So never use a magnum primer, always prefer the Remington 209-4 (now replaced by the ‘Kleanbore’) if you can get any. Winchester is also now making a special 209 for muzzleloaders. If you must
use any primer other than the ones specifically made for muzzleloaders, then use the weakest one you can find, like those made for low power trap and skeet loads.
There was no surprise in the amount of blowby left in the breech after each shot.It was about the same as with any #11 or
musket cap. Since the touch-hole in all cases is the same diameter, it would be reasonable to expect a similar amount of blowby with similar loads. Cleaning this area after shooting should be no worse than with the #11 or musket cap.
The White 209 breechplug will universally fit any White rifle so far made and has the same 3/8 inch diameter industrial hex head that will fit any 3/8 inch hex wrench- no special tools needed for installation or removal. Use the 1/4 inch socket set in your tool box if you want. Grease the 209 breechplug with White’s new Super Blue moly breechplug grease when you install it, just as you would the old #11 nipple-breechplug, so it will come out easily when it’s time to clean.
I have recommended to White Rifles LLC that they immediately bring the 209 primer kit for W-series rifles into the market. There will be a new breechplug to replace the old one and a new hammer with firing pin to replace the old one for #11 or musket cap. There are no other parts changes. I don’t know what the cost will be. I have also recommended that they carry appropriate primers, which can be hard to find, thereby solving the ‘find’ part of the problem for our shooters. This involves getting a Hazmat license so it may be a while before that happens.
Good Hunting
DOC
THE NEW 336 PRIMER
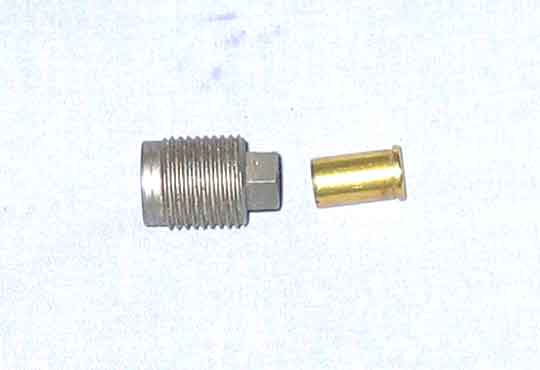 |
| White short 336 Breechplug and 336 primer. The 336 Breechplug is the same size and thread as other White Breechplugs. The 336 primer is an adaption of the old S&W Short cartridge. It uses a small pistol primer and is reloadable with common reloading tools. |
It has long been apparent that the 209 shotgun primer is not the final answer
to muzzleloading ignition. Results with the common brands of 209 primers has been erratic to say the least.
For one thing, 209’s are way too fragile to stand up to the higher pressures
encountered in most muzzleloaders unless supported by a metal case, as in the Savage or a solid breech design, like the White T-Bolt. Ordinary shotgun pressures are low, in the 8-12000 psi range. Pressures in muzzleloaders can be as high as 30000 although most loads are less then 20000. Especially potent loads in slam-fire rifles can be expected to destroy the primer, with lots of leak to the rear to dirty up the action.
The weakness link in the common brand 209 is its thin copper or brass rim, which is not stout enough for sure extraction. This rim bends easily and does not support the edges of an extractor well. If the 209 gets stuck in the primer
pocket, and this can happen easily with black powder residues, the primer can be a regular bitch to pry out, simply because the rim will not stand up to prying. In consequence, most muzzleloading manufacturers have made their primer pockets excessively loose or shallow, or both, resulting in lots of blowback and a dirty breech.
209 primers are also quite sloppily made, with a lot of size variation between brands and even individual lots. This is natural, as 209’s are made to fit in the back end of soft plastic shotshells, with thin brass sheathing and often paper wadding. That means that a lot of variation in size, though not in quality of ignition, can be tolerated. Alas, this variation does not work well in steel primer pockets. Again, the solution is a larger and shallower than needed primer pocket with lots of blowback.
The one thing that 209 primers do well is ignite shotshells. They do this well because the amount of primer material is relatively large, and relatively surefire with a light firing pin strike. The one thing that shotgun shooters demand is sureness of ignition. They do not need accuracy, as they depend on a pattern of shot to harvest their game or break their clay. Thus, the amount and temperature of flame in a shotshell can be far in excess of that in a rifle or pistol cartridge. This situation has resulted in several problems in muzzleloaders, the worst of which is ‘over-ignition’, a term that describes too much flame and pressure for accuracy or safety.
Rifle shooters long ago noted that the most accurate loads were those that ignited progressively, from the back end. Pressures are lower, burning rates are more consistent, bullet jump is avoided and accuracy is enhanced with lower power primers. I well remember loading 308 Winchester target loads with special cases made for small rifle primers, just to enhance accuracy. Target primers are always loaded with less priming material than hunting loads.
Bullet jump is probably the bigger bugaboo with 209’s in muzzleloaders. The common brand 209’s are so powerful that they will throw a bullet clear out of the barrel all by themselves. There is no great velocity there, but the fact that they will is evident of their greater power. It seems that this greater power results in the muzzleloading bullet being shoved ahead by the primer
alone, before the conflagration of the powder catches up to it. The shove is naturally going to be quite variable, so the distance up the barrel before powder burn catches up is going to be variable as well. Accuracy problems are understandable.
White long ago recommended the use of the Remington 209-4 primer in its 209 using rifles. This primer was especially made for the 410 shotshell and had about half the power of the ordinary 209 primer. It enhanced accuracy in White rifles, but was hard to find at the ordinary sporting goods store. I had to ship mine in from far away and had to buy 5000 at a time to get them. Remington ceased production of the 209-4 last Spring, but has apparently substituted the ‘Kleanbore’ line of 209 primers. Other manufacturers have advertised 209’s made especially for muzzleloaders, the RWS primer being advertised for at least the last year, but I have yet to see any of them in Sporting Goods stores. Using the lowest power 209 available is the only thing a shooter can do.
With all this in mind, several years ago I started looking for an answer to the problem. It was obvious that some kind of primer containing case would probably do the job. The problem was which one. Savage turned to a solid metal case for the 209 primer in its rifle. The resemblance of their case to the back end of a 30-06 is obvious. I found that its size and weight was a deterrent to its use, although it seemed to work well, the very length cooling down the priming flash by virtue of its distance from the powder charge.
Others wrote about shortened 22 Hornet cases, using the small rifle primer. I tried this in a re-barreled Remington single shot shotgun. I cut off the barrel in front of the rotating lug, bored out the shotshell chamber on the lathe and fitted a White 504 barrel to the stub, soldering it solidly into place. The barrel was already drilled and tapped for the White nipple breechplug. I modified a White 209 breechplug, the one used in the ThunderBolt, to take a shortened 22 Hornet. I found that it ignited any powder I wanted, including smokeless, but did not contain the blowback. The shortened case wall was just too thick to expand with the shot. Besides, I had to shorten the Hornet cases, a major pain without an expensive hardened cut-off die.
I considered the 38 special case but it was too big and too long. The 38 S&W was shorter but still too large in diameter to fit the basic White breechplug. I did not want to have to change the interior diameter or legnth of the breechplug pocket, which so far has been the same in all White rifle barrels, no matter when made. The 32 mag was about the right diameter but was way too long for the breechplug and I did not want to have to cut them off. Rimless cartridges were available, but too hard to extract. I tried 25 and 32 Colt auto cases, found that they worked quite well, containing all blowback despite the short length, but their rimless cases were hard to extract from a Pyrodex contaminated pocket. I decided to stick with rimmed cases.
One day I was in a local hardware store and noticed a display of cartridges. They were at eye level or I never would have seen them Two boxes of Remington 32 S&W were displayed. What attracted me was the flatness of the box, telling me that the case was very short. I grabbed a box and popped it open. I knew that the 32 S&W (Short) was the first 32 caliber center fire cartridge ever made by S&W, originating back in the 1880’s or earlier. I thought that it had bit the dust long ago and was no longer manufactured. Lo and behold, these were indeed newly manufactured 32 S&W’s, come to find out a caliber favored by Cowboy Shooters for small pocket pistol matches and currently produced by both Remington and Winchester with 80 grain bullets at about 700 FPS.
I bought those two boxes, pulled the bullets and reamed a proper .336 pocket to fit in a White breechplug. First rifle I tried was a re-barreled H&R .410 Topper, cut off in front of the lug and with a White 504 barrel sleeved and soldered in place. Worked fine with absolutely no blowback. Extracted easily with its substantial rim. Proved to be large enough to handle quickly and easily, being somewhat larger than a 209 primer or 25 auto case. I then adapted a ThunderBolt to fit it. That took about 30 seconds, long enough to screw out the 209 beechplug and screw in one for the new primer. Once again, excellent results. No blowback, surefire ignition with all powders, thick rim made for easy extraction and size just right for quick and easy handling. Not too large to fit into the breechplug even with cold fingers under a scope, not too small to be easy to get hold of in a hurry. And the rim would adapt to a priming tool easily.
 |
| Theoriginal 32 S&W cartridge is illustrated left, the White 336 Primer in themiddle, a fired 336 Primer on the right. Note that staining on the fired primerdoes not extend to the base of the case, The thin wall of the primer’s caseseals off powder gases with no leak to the rear. |
I took the concept to Africa in July 2004, using a T-Bolt .451, where it proved viable. I shot all the nine animals that I took with it, never fumbled a primer once, and used fingers alone to load the primer on the eleven shots I fired at critters, plus about 20 practice shots. Loads went as long as three days between loading and firing. eight out of nine shots were one shot kills, a Kudu taking the other three. Ignition was sure, with no misfires, and accuracy was phenomenal, my 1600 FPS load shooting into an inch at 100 yards with the 45/40-350 PowerStar saboted bullet, no cleaning between shots.
The cases are also reloadable. My CH reloading press handles primer extraction and re-priming without a hitch. For those of you who do not reload, all you need is a hand held priming tool, the proper case head holder and a common punch and something to hit it with. RCBS, Lee and CH all make hand held priming tools that cost less then $30, the Lee being the cheapest at less then $15. Case head holders cost less than $4 and some of the tools have a universal head. Punches are available at hardware stores as are small hammers. Many brands of ‘small pistol’ primers are available, all made to high standards of size and power. A magnum version of the small pistol primer is also available if you want.
If you use the new primer with Black Powder or a substitute, and want to reload it, you will want to clean out the black powder residue after shooting. This is a simple task. replicating what you do with Black Powder cartridges. I throw the spent primers in a cup, drop in a drop of detergent and add hot water, then swirl the solution and primers around for a few seconds. I do the swirl a second time with a rinse of hot water only, then dump the rinse and spread the cases out on a paper towel to dry. You can speed up the drying in an oven at low heat if wanted but it’s really not necessary. Once the cases are dry, they can be re-primed.
I once recommended that White offer the #336 primer conversions for ThunderBolt rifles and that the concept be incorporated into the new Alpha rifle once it is in production and the 336 breech-plug is standardized. One further modification is advisable. The diameter of the flash-hole in the usual White solid Breech-plug ends up at 80 thou once the plug is drilled and reamed for the 336 primer. The smaller the flash-hole, the less the blow-back and some claim the better the accuracy, but also the greater the chance of a mis-fire because of the chance of flash-hole plugging. Muzzleloading target shooters often insist on flash-holes of about 30 thou, but few targets charge and stomp you into red mud. I toyed with the idea of a replaceable flash-hole a la Savage (it;s a simple short hardened screw with 0.032″ touch-hole leading off a hex), and finally got it done here lately, installing one in the breech-plug of a modified H&R Topper. It works fine and all the powders I tried ignited without a hitch, due probably to the shortness of the White Breechplug.
32 S&W Short cases are available at many sporting goods stores and over the web. The caliber has become very popular for CowBoy Action shooting in small pocket pistols. Cost is about 10 cents apiece in quantity. Small pistol primers in both regular and magnum persuasions are available everywhere. So are the reloading tools.
By the way, one of the quick ways to get the spent case out of the primer pocket is to simply open the action after the last shot and reload the rifle. Don’t bother to remove the spent primer. The new bullet will act somewhat like a piston and usually pop the spent case out of the pocket when you shove the new bullet down the barrel. It works every time if you keep the primer pocket reasonably clean.
Good Hunting
DOC
The SCS Sabot and SCB Bullet
I believe that the biggest bugaboo for both traditional and modern-day muzzleloading is cleaning the rifle between shots. When I first joined muzzleloading back in the 1950’s, the first lesson was that the rifle had to be cleaned between shots. I found this fine on the target line, but I found it to be a real pain and impossible, if not dangerous, while hunting. I always imagined myself furiously cleaning my rifle while Old Ephraim popped his teeth at me, enraged because the first bullet didn’t quite do him in.
A serious reading of the muzzleloading literature from the bad days of the French and Indian war up through the many battles of the Old NorthWest fail to show me that any Indian fighter or serious hunter had any interest at all in cleaning his rifle between shots. The literature of the early west also confirms that no wise frontiersman cleaned between shots. Indians and grizzly bears were just too ferocious and fast.
Thus it was, as a serious modern-day muzzleloading hunter, that I found myself pondering the best way to avoid cleaning, in fact, pondering the best way to shoot as many times as I could before the gun clogged up so much that it simply had to be cleaned.
I found the answer in part in the White Muzzleloading System with its tightly fitted but slip-fit elongated bullet. The world-wide experience of the Mini-Ball, and the later British experience with Whitworth’s elongated slip-fit hexagonal bullets convinced me that we moderns could duplicate and maybe even better the performance of yesteryear. I was right, largely because of modern industrial techniques and the development of Black Powder substitute powders. Pyrodex P came along at just the right time.
However, even that superior system did not totally answer the problem. I quickly found that shooting in the dry West limited the number of shots I could fire with a White rifle and bullet before the powder residues build up enough to inhibit accuracy and retard a quick reload. I also found that shooting in the wetter East and South, though sloppy, was much less limited. Once, at a demonstration in Georgia, we fired a White rifle and bullet 219 counted shots with never a cleaning rod down the barrel while we watched our competitors clean after every shot.
Of course, that’s not hunting. A muzzleloading hunter gets one or two, at best three shots at fleeing game, with rare exceptions. Any more than that means he’s got the wrong rifle or he’s the wrong man for the task. What the hunter needs is quick reloads, for that occasional circumstance that demands a second shot, with accuracy undiminished from his first shot. Years ago, I was cleaning up some old stuff, an accumulation of antique black powder bullets (both muzzleloading and cartridge) and some old books. I idly glance through the bullets, picking up several made for black powder cartridge guns. These were paper patched. I knew that paper patches had never worked well on muzzleloading hunting rifles, the paper patch being too fragile, although they are very useful on mechanically loaded target slug guns, but they caught my attention.
Before the day was out, I had thumbed through the books, especially attracted to one on Civil War cannon by Harold Peterson. He had illustrated the slip-fit shells used on those muzzleloading monsters, showing the mechanisms that caused expansion in the bore when they were fired. All were loaded slip-fit, the slightly undersize shells sliding down the lands of their rifled bores. There were several with expanding copper bands and some with flaring copper butts. None looked like they would work in a modern day muzzleloading rifle. They were simply too complicated to manufacture or function reliably. While thinking on this, I picked up a more modern bullet with a copper gas check on it. I glanced at it and turned to throw it in the discard pile. The thought struck me like a brick to the side of the head. Why not an expanding gas check, loaded land-to-land size, expanding to groove-to-groove size with the shot? Seemed like a great idea. So simple, like all truly great inventions. But on second thought, I was sure someone had already thought this one up. I pretty nearly forgot the subject for several months, then had a slack day. I spent it researching the concept. Lo and behold, it appeared that no other inventor had ever thought of the idea, or at least patented it.
Looks like a gas check, but it’s far more then that. It not only loads easily, protects the sabot or bullet from gas cutting, evens up pressures and enhances accuracy, but also cleans the barrel with the shot. Every shot loads and shoots the same as the first shot. Clean-up is easier, too.
Intrigued, I arranged to have some made. The first ones were crude and hand stamped, but they worked!! I was pleased, not to say ecstatic. I originally tried them with ordinary loads, up to 100 grains PyroP and a White saboted 435 gr PowerStar bullet in a modified PowerStar sabot . They worked fine. The bore was uniformly clean from shot to shot and the number of patches required for eventual cleaning the rifles was fewer by half than without the Self-Cleaning Sabot. It was clear that I had a superior idea and that it worked quite well. I tried it with the dirtiest black powder I could get hold of, some heavy grained old stuff we used to use in small bore cannon. To my amazement, it even swept that filthy stuff out of the bore.
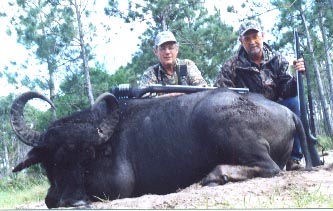
I also tried the device on the back end of my PowerPunch bullets. I had to machine each bullet on a lathe to fit the SCS device on the back end. I called it the SCB for Self Cleaning Bullet. To my vast delight, the device worked there just as well as it did on a plastic sabot. It worked every bit as well on heavy loads, like 140 grains PyrodexP and a 600 grain PowerPunch as it did on lighter target loads, keeping lead and powder residues at ‘first shot’ levels. I subsequently used the 504 caliber 600 Power Punch with SCB device over 140 grains Pyrodex P to take the new world record Asian Water Buffalo. Groups ran 1.5 inches at 100 yards for 5 shots. Interestingly, if I used the same 600 grain bullet without the SCB device, accuracy went to hell above 120 grains. In effect, the SCB device added another 20 grains of powder to power limits with excellent accuracy while affording easier loading and cleaning at the same time.
Now, one of the reasons that I advocate Pyrodex P in most White rifles is that it burns more cleanly then Black. Use Black Powder and you will have to clean between shots , even with the clearly superior White Muzzleloading System. Use Pyrodex-P and you’ll get far more shots without having to clean than with Black. Now, with the copper SCS device on my sabot, I can go back to using Black Powder if I want. I tried it with all the other powders as well, some old Arco, ClearShot, CleanShot, Pyrodex RS and Select, and every brand of Black Powder available. It worked with all of them, keeping the barrel as clean as if every shot was the first shot and making clean up chores at the end of the day much easier.
It’s obvious that the device will work every bit as well on a lead bullet as on a plastic sabot. It’s also obvious that it will work in black powder cartridge rifles too. By summer White hopes to have SCS sabots with PowerStar bullets and SCB PowerStar bullets available for purchase. They will be available in 45 and 50 caliber to begin with, other calibers later. SCB bullets and SCS Saboted bullets for all calibers and all rifles with all available rifling twists will most certainly follow.
Watch for them. They will change your muzzleloading habits dramatically. Just think, you’ll never have to clean your muzzleloading rifle after a shot in the field again. And cleaning it at home after a shooting session will be much easier. No matter what brand rifle you shoot, White or otherwise, the new White SCS will work for you. DOC
Here is a photo of the 600 grain SCB bullet used to kill that big Asian Water Buffalo with me and Randy Smith behind it, before loading and after retrieval from the buffalo. Obviously, the copper SCB gas check stays with the bullet, expanding and flattening out, preventing gas cutting of the bullet base and cleaning out powder and lead residues as it flies down the barrel.
Want to see a collection of really fine rifles? just click on the ‘custom traditional’, ‘custom modern’ or ‘Archives’ hyperlink above
AN UNUSUAL HAWKEN
As a group, most students of Hawken rifles believe that neither Jake nor Sam ever produced a flintlock rifle in their St. Louis shop. They may have, of course, but if so, none were marked or otherwise identified. The Hawken rifle illustrated below may be the exception.
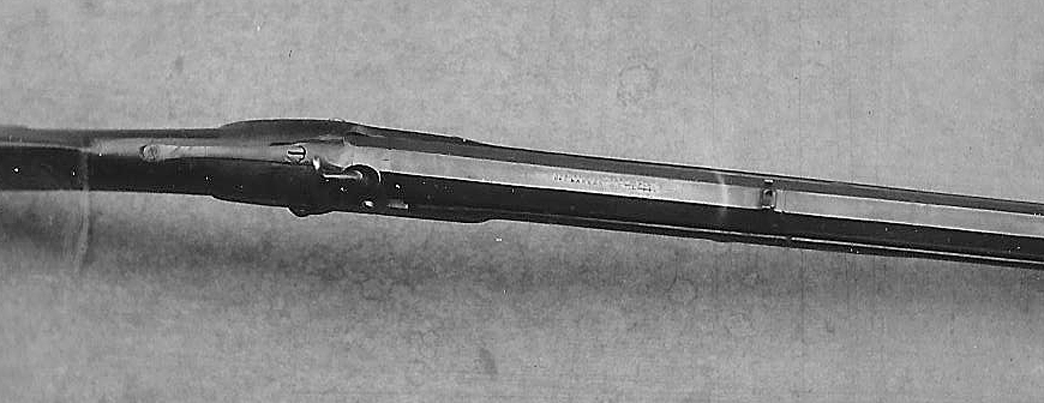
One of my great blessings was the US Army, who in their wisdom, sent me to Alaska for two years back in the late 1960’s. I arrived there in Feb, 1966 and almost immediately made the aquaintance of Bill Fuller, who ran a gunsmith shop at Cooper’s Landing, on the Kenai Penninsula, about an hour and a half out of Anchorage. Bill had a half dozen original Hawken rifles at the time, including the one shown below. This particular Hawken was in excellent shape, with a heavy slightly swamped barrel in 58 caliber. The bore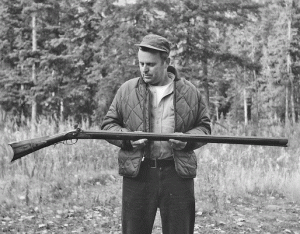 was likewise in great shape and it shot quite well. The stock was walnut, unusual for a Hawken, the furniture brass, also unusual for a Hawken and the styling is pure Maryland with a Lancasterish bent. If this rifle had been produced in Christofer Hawken’s Maryland shop, it would not be unusual at all. But, no, the barrel is clearly marked J S Hawken, you can see that in the lower photo. The rifle also has a typical Hawken style patent hooked britch with long tang, but does not sport the long double-set trigger bar of the more typical St. Louis Hawken rifles. The lock is clearly a conversion from flintlock. The holes for frizzen screw, frizzen spring screw and frizzen spring detent are clearly seen in their usual places on the lock plate. The barrel is 40+ inches long and the rifle weighs 14 lbs.
[/two_third_last]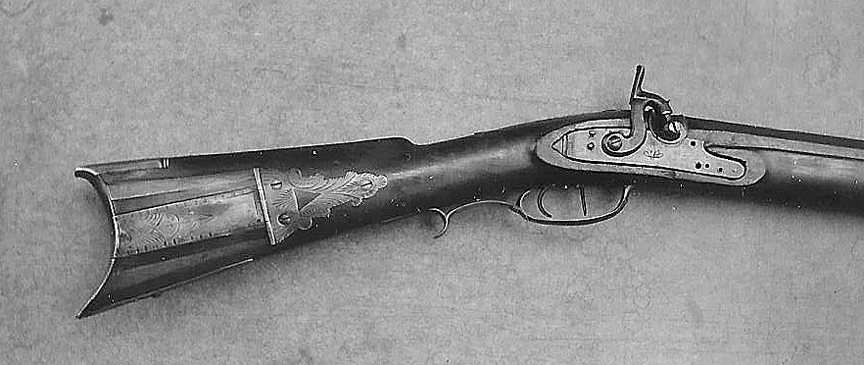
Above are Bill Fuller and the Maryland/Lancaster style Hawken-St. Louis marked rifle, The photos were taken the summer of 1966. You can see the swamp in the octagon barrel. Note the typical, late Maryland style brass buttplate and the late brass patch-box. I call it late because the side plates are so plain and there is wood between the lid and the side plates. The side plates are decorated with a wobble of ‘chicken tracks’, a simple form of engraving. The trigger guard matches the style of the patch-box and is big enough to carry the double set trigger. The DST trigger bar is short, in typical early Eastern style. If I had to date the rifle by those features, I would say it was made in the East, probably Maryland, in the 1820’s.
The lock plate is also late, with the flat plate and abbreviated pointed tail of later flintlocks. It is probably a commercial lock, imported from elsewhere and sold to the gun-making trade. The frizzen and frizzen-spring screw-holes have not been filled, as was a common practice when converting locks from flint to percussion yet the finish on the lock is excellent with traces of color still present. The Hawken snail breech has filled in the flintlock pan area quite nicely. There is a bit of wood missing from just above the forward extension of the lockplate, implying that the rifle saw at least some use during its active life. The oil finish on the walnut is still in good condition, there are comparatively few wear or use marks, so was sparingly used or awfully well kept.
[one_half]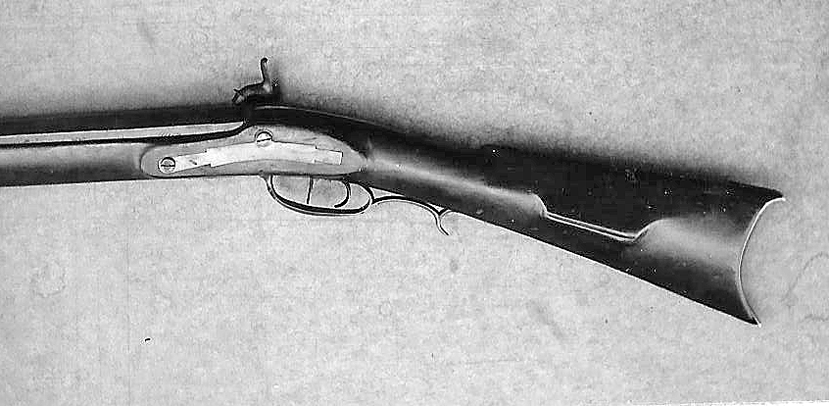 [/one_half][one_half]
 [/one_half]
The side-lock plate is brass and Marylandish with a curved bottom and sparing engraving. The cheek-piece is typical of Maryland/Lancaster rifles. There is no other carved decoration anywhere, which indicates production in the late first quarter of the 1800’s. You can see the Hawken style long tang, which appears to barely fit an older short tang mortice. Look closely and the earlier mortice marks stand out about a third of the way back on the long tang. the Hawken stampings stand out in the rightward photo. Look how far forward the rear sight is, a feature often seen on Eastern rifles of all schools.
The real questions are obvious. Who made it? When was it made? Where was it made? When was it converted, if it was converted. Did the Hawken brothers make it or did they convert it later, using their Hawken breech and long tang? I am sure that every reader will have an opinion. I am going to hazard mine. You may agree with me, or not.
I very much doubt that a heavy rifle like this one was made in Maryland. By the 1820’s, Maryland rifles, in common with Eastern rifles of most schools, were tending towards small calibers. Big game had disappeared by then as had the threat of frontier war. Big and heavy indicates manufacture in the West or at least for use in the West.. It was probably made in St. Louis for the transcontinental trade.
It was probably originally flintlock, then later converted to percussion . Its excellent condition probably means that it never went across the plains and was never used in the mountains. The owner was probably local, wealthy, demanding a true Hawken conversion rather than just a common drum and nipple, which was much cheaper. The care that it has obviously had indicates a careful and sparing user with enough means to get what he wanted.
When did the Hawken’s mark it? Obviously, sometime during Jake’s and Sam’s partnership. Who knows if they built the rifle in the first place. We only know that at some time it passed through their hands and they marked it, probably because they converted it. I suspect they built it. They certainly knew the style. It was probably one of their earliest rifles, done on custom order, before they developed the classic Hawken style for which they are so famous, then later converted and marked.
DOC WHITE
PERFECT CAMO, PERFECT CALL – Turkey 2011
I wish I had a picture of this. There I was, sitting in a beach chair, surrounded by two foot high grass, with a bull elk 20 yards away. The bull was looking straight at me, nose and head thrust forward, ears at attention, eyes searching. The only question was how soon he was going to see me and alert the whole country that I was there.
This scene had all started a month earlier, in early April of 2011. I and two of my best buddies, Les Bennet and McCord Marshall, arrived in Texas on the eastern edge of the Big Bend country to hunt turkeys. It’s a trip we take annually, the best reason being that we can take 4 turkeys in this part of the world where at home we only get one.
Normally, the hunting is terrific, with plenty of birds in the strut and lots of opportunities. This year was destined to be different. Where usually the weather was pleasant if not a bit too warm for us cold country boys, now it was cold one day, down to 63, or super hot the next, up to 105. Where usually the wind was a pleasant breeze it was now a honking blast, with gusts what would knock over your carefully arranged cover and almost take you to the ground. It was tough to even keep powder in the pan of my flintlock. Where before the birds were well into the strut, running at my amateurish calls to be first to get to what they thought was a hen, the strut hadn’t even started, or maybe it was already over. Calling actually sent them running the other way.
Naturally, I brought along a brand new flintlock fowler, this time a copy of what I thought a Chief’s Grade northwest gun might look like. It had a nice cherry stock and a 12 gauge Colerain octagon to round smooth-bore barrel with one of my custom made interchangable .660 chokes. I was throwing 1 7/8 oz of shot surrounded by a White tapered shot cup ( tapered so you can get it into that tight choke) over a couple of wool Wonder Wads and 100 grains of FFg Black Powder. It was a great load, especially with the #7 nickle-plated hardened shot I used, throwing super tight patterns at 40 yards, usually good for 8-10 hits in head and spine.
The gun, meticulously made as it was, didn’t do me much good this year. The priming powder stayed in the pan as long as the frizzen was down, but as soon as to popped open with the shot, the priming went flying in the wind. No shot, no turkey. I had a big tom in my sights at 30 yards, head up, looking right at me, giving me time enough to prime, cock and pull trigger 4 times before he finally got the idea that something was amiss and left the scene. No wonder Alexander Forsyth invented the percussion system.
Needless to say, the situation was very frustrating. Les managed to get a few birds, Mc Cord got two and I only ended up with a single. Both the other guys were shooting modern guns, no wind effect there. Cartridges don’t care about the wind. It made me wonder what would have happened had the tom been a Shawnee back in the Old Northwest, hearing the clack of an opening frizzen, not followed by a shot. No wonder the long hunters carried pistols, knives and tomahawks. I would have been happy had the turkey charged me after a misfire, but frankly wondered at if I could counter the charge of a Shawnee warrior.
[box type=”shadow”]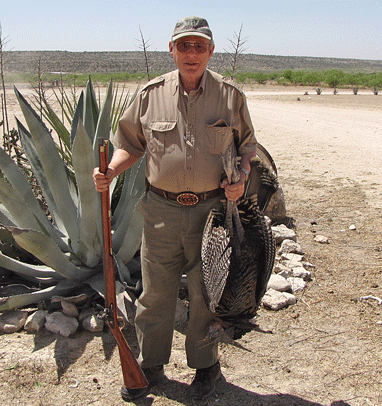 The wind finally calmed enough for a photo. Here I am, out of camos, ready to head for home.[/box]
We returned to Utah for the opening of the Utah Turkey Season, just a week later. Glory be, the weather was just as bad in Utah as it was in Texas. Instead of hot, it was cold as your mother-in-law’s kiss, down to freezing and below in mid April. The trees tried to blossom and got frozen, had to go it again. The wind blew like a maniac. The turkeys were absolutely not interested in strutting, staying spooked by all the wind. Normally, Utah turkeys are a lot more spooky than the Texas kind, anyway. There are fewer of them in the first place, there is a lot less cover in the second and the predators are bigger and meaner in the third. Utah turkey hunting is usually a hard hunt anyway. This year was impossible.
We saw turkeys, but always at a distance and always on the move. The wind had them spooked but good. Any strutting we saw was half hearted. Gobbles were at a premium, a few from the tree, none as soon as they hit the ground. Feeding was done at a trot, a peck here and there as they zoomed past, always out of range.
The end of the Utah season loomed, at least the end of it for me. I was headed to the Anasazi Rendevous in Southern Utah on the last day of the season and wouldn’t have time to hunt. I did get out on the day before. McCord had spotted a small herd that moved though a cornfield at early light every day. We determined to ambush them as they moved through.
Naturally, the best laid plans run amuck. That day they decided to get into the strut. The day was pleasant and bright , with no wind. They came of the tree gobbling their heads off and gobbled all the way to the cornfield. We thought we were in heaven. Except that instead of following their wind-blown pattern of travel, they wandered into the field, obviously henned up, in full strut, and from the wrong place. We were about a hundred yards short.
Sexy clucks did no good. They got gobbles but no action. I would call and one or several toms would gobble, then the boss hen would cluck and the toms would turn back into the herd. I even tried calling the boss hen, challenging her as if I was another boss hen, ‘come over and fight’, but she just ran off. I guess I was too aggressive, sounded too tough. We had the fun of watching, but no shooting.
I thought that was the end of my turkey hunting for the year in Utah, but I was wrong as usual. The rest of the day went to hell and instead of leaving for the Rendezvous, I was stuck in town for another day. When it became obvious that I would not get out of town until the next day, I decided to give the turkeys one last try. This is where the story started.
There I was in the grass and weeds. It wasn’t classic turkey cover. In fact, it bordered the cornfield where we had seen the turkeys the day before. It was still cold, 34 F. on the thermometer, cold enough that I put on my goose hunting parka with fall grass camo. I figured the grass pattern would match up pretty good with the weeds and cornstocks. As usual I was sitting in a camo beach chair, low down to the ground, butt just scraping the turf. The chair allows me to sit for long periods of time without back or butt pain. I had my new once fired flintlock Chief’s Grade NorthWest gun in hand. The sky was dark as the inside of a cow.
I heard a few tree gobbles from the north, sounded a long ways off. I didn’t really know the distance, but the nearest roost tree was about a half mile away. As it got lighter, the gobbles increased in intensity and volume. I called a few times, loud because of the distance. I thought I got an answer. Sounded like they were on the ground and coming closer. I noticed a little movement in the distance. Elk, mixed cows and bulls just beginning to sprout their horns. They were grazing my way. The gobbles were getting closer too. Sounded like half as far now, twice as loud as before. I cut the volume on my clucks in half. I got a gobble with every cluck. Sometimes two or three gobbles.
Oops, the elk were closer, in fact, right on top of me. I was behind a pile of rocks and dirt with a few rotting tree trunks thrown in and weeds and grass growing up all around. The elk herd was dividing to go around me on either side. One bull, with a foot of new antler on his head, was coming straight at me. He ended up 20 yards away, with the gobblers now loud and close, I figured within 100 yards and responding enthusiastically to my clucking.
I knew what was going to happen. The turkeys were going to appear at the same time as the elk finally spotted me. The elk would spook and the turkeys would be alerted and run off. The performance would match the rest of the year’s turkey hunting. I decided to scare the elk off, so I clucked at him as he grazed along, nice and loud. I got a big triple gobble, sounded real close now, and the elk whirling around to stare for my trouble.
The bull spent a full minute or more staring. He stared straight at me. I figured he would see me and run off, hopefully before the turkeys were close enough to spook. Then the bull went back to gazing. I called again. Once more some big time gobbling, close. The bull took a look then went back to grazing, coming even closer than before. The third time I called the bull didn’t even look. It occurred to me that my camo was so perfect and my call so good that the elk couldn’t tell that I was not real. Wow!
By this time the elk was past my field of vision, off to my right. I forgot about him as two cows walked past, following the bull. The other elk went past on my left, where I was better hidden. The gobblers were getting closer, just behind the frieze of brush to my front. I shifted position, got the gun up and shifted to a one handed call. I had been using a box call before.
Three hens suddenly appeared 30 odd yards out. The pecked their way past, gobbler’s red heads poking above the brush a few yards behind them. Five toms, all together , two or three gobbling together, responding to my faint clucks, heading my way. The first one was a Jake, the others bigger. The last was a three year old with a good beard. They came at me in a pack.
It was hard to tell which was which as I could only see their heads above the weeds. I kept careful track of the three year old’s head. When he stepped out in front a bit, far enough away from the others that I wouldn’t hit more than just him, I pulled trigger. The flinter went off flawlessly and the tom disappeared. There was a flurry of feathers, with turkeys dashing here and there. Two of them came back and jumped the downed bird as I jumped up and ran over to— the Jake. Very dead, all 17 lbs of him, tail torn and pecked, obviously the bottom of the pecking order.
I laughed and laughed. I’ m not sure what I laughed at; the terrible season finally over, the pride of a supposed great hunter taken down, the beautiful day, the accumulation of frustrations, a touch of last minute success, or what. But the laugh was joyful. I had learned some good lessons. Never give up. Accept the blessings thrown your way with a grateful heart. You are a better hunter than you think you are. Flintlocks just make the game funner. Your camo and call were perfect for at least once in your life. You have a tasty morsel in hand. Who wants a smelly, tough old tom in the middle of the rut anyway.
And he was tasty. I threw him the truck and took him to Rendezvous. I dressed him out there, used a bit of the meat for bribes and treats and traded the feathers and wings. The breast meat was delicious cut in thin slices and fried in butter. The legs went into the stew pot, boiled slowly until the meat fell off the bones, tantalizing a slew of folks who came by to say hello. A great end to a frustrating season.
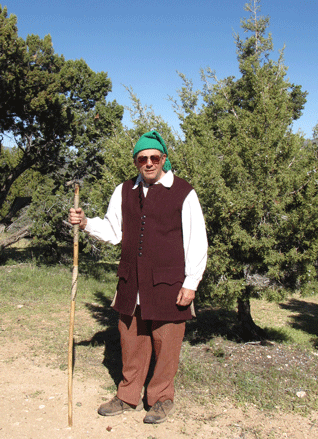 Here I am at the Anasazi Rendezvous. Looks bright and sunshiney but the thermometer said 34 F. I have on almost all the clothes I brought with me, including waffle weave underclothes, a sweater, frilly shirt and Ohio style padded wool winter waistcoat, as well as heavy gabardine pants. The wool cap is not for show, keeps my bald head warm. The walking stick is functional, too. I stumbled in a ploughed field hunting turkeys a few days before this photo was taken and wrenched my good right knee. The left knee is a replacement.
Good Hunting
DOC
The Truly Traditional Hawken
When Jake and Sam Hawken left their Maryland home in the 1820’s for St Louis, they did so for the same reason that most of us move. Opportunity was the name of the game and St Louis was the epicenter of that opportunity. Many thought that the opportunity was in the Shining Mountains of the West, but Jake and Sam knew that those entrepreneurs who supplied the burgeoning western fur trade were more likely to get wealthy and stay alive too. The survival rate in St Louis was far better, even with the Cholera, than was the 50% death rate of the trappers.
It is apparent that they had received solid training from their gunsmith father, with apprenticeship in the gun making trade. The rifles, pistols and fowlers turned out by the Hawken family in the Maryland days were Maryland style rifles. The one Hawken rifle signed by the brothers that doesn’t follow the general conformation of the later Hawken style is obviously a Maryland style longrifle, brass accouterments and all. I heard of it last in the hands of a New Mexico collector.
That all changed when the Hawkens started their St Louis production. We have no idea what unmarked Hawken rifles looked like, simply because they are not identifiable, that is, if there are any. We don’t even know that there are any. But we do know this, all known and marked Hawken rifles, whether fullstock or halfstock, follow that same basic conformation, with solid hooked percussion breech, long tang double bolted to a long bar Double Set Trigger, right handed percussion sidelock, with forestock keyed to the barrel rather than pinned, often with decorative surrounds, mostly iron fittings with silver occasionally thrown into the mix, a trigger guard clearly copied from the popular British sporting rifles of the time with a curl at the rear and a curved buttplate fabricated from iron sheeting and brazed together. Only later rifles have cast buttplates imported from the East.. Other details varied a little.
It is obvious that many of the details of the more famous of their rifles were gleaned from the English rifles of the day. Whether or not this styling came from personal exposure to English travelers or from design catalogues and literature is unknown, but the styling is obvious. The patent breech, with its hooked tang, was invented early on by the better English gunmakers. The Hawken variant is not so unusual that it is not seen in English and continental rifles and shotguns. The scroll trigger guard is likewise a very English feature and was very popular in England during the Hawken years. The fore-end treatment was likewise English in styling. The Percussion lock and the simple lockbolt plate on the opposite sidelock panel were also typical of the understated English styling of the day.
An original heavy Hawken rifle once owned by Bill Fuller of Cooper’s Landing Alaska. At one time he had a half dozen originals at his place. I got to know him well back in 1966-67.We dissected all of them and shot most. He killed a black bear that was messing in his garbage with a Hawken fullstock. This one was my favorite, 58 caliber, slightly swamped and tapered barrel 38 inches long, 1 1/8″ at britch, 15″ pull to front trigger, 12 lbs., a big rifle made for a big man. It fit me just right. I heard that Jim Gordon of Santa Fe has it in his collection now.
This is not to say that the Hawken brothers did not craft their own art into their guns. The most prominent difference is in the buttplate, which was deeply curved rather than the shotgun style butt of most English rifles. The use of a double set trigger is likewise an offset, as the English preferred the single set trigger. This may have been because the DST was simpler and far sturdier than the SST. It was less likely to break down in the far West and could still be used as a single trigger if it broke, something that most SST’s could not do. The fore-end cap, which was often Ebony wood or horn on English rifles, was most often iron sometimes silver plated in the Hawken, Every screw I’ve ever seen was originally blued, though usually only traces of the blue showed. Barrels could be browned or blued, hot rust bluing being far more common then than we think now, most of it having faded to brown. Both made use of case hardening in color with breeches, tangs, trigger guards, buttplate and locks finished in brilliant case colors. Another difference was wood and finish. Most Hawken rifles were plain maple, some few walnut, both woods obviously chosen for strength over figure and were painted with a dark varnish. (Or the original varnish has faded to dark, almost blackish, over the years) Most of the known antiques show a little of it, some no finish at all. The fullstock Hawken that Bill Fuller in Alaska used to kill a bear messing in his garbage was nearly bare yellowish maple, all finish having disappeared with use and years. The finish on the Bridger Hawken in the collection of he Montana Historical Society clearly shows the blackish varnish in places not worn by handling. Hardly any figure shows through. It shows no signs of refinish.
 This is something the Hawken Brothers probably never did: a fullstock flintlock with brass furniture and a flat to the wrist trigger guard. By the way, it’s a charming rifle, but once again, hardly traditional.
Two things the Hawken brothers never did: as far as anyone knows, they never produced an iron mounted flintlock rifle in the St Louis shop, at least not a marked and identifiable one. We all presume that they did, just never marked them. But even then, if they did, the styling is not recognizable as a Hawken, like the later percussion ones. Also, our modern flat to the wrist trigger guard was rarely used by the Hawkens. It appears on only a few of their known and marked rifles. There is one exception to the apparent scroll trigger guard rule, a brass mounted Maryland style rifle with J&S Hawken markings on the barrel- see my article “An Unusual Hawken” – that Bill Fuller once owned. It’s now in the Winchester collection in Cody Wyo.
Another item for the strict traditionalist to pay attention to is the curl at the rear of the trigger guard. Early Hawkens appear to have had a more rounded curl than is currently available on the reproduction market. Later rifles did indeed have the narrowed, slanted curl that we more commonly see on reproductions. Of course, a good gun-maker can re-forge an incorrect modern casting into any conformation that he wants.
The last item is the corner of the buttplate, the upper rear corner, that is. Many later plains rifles have an attractive rounded detail in that location. Many modern castings include it. It is pretty. But it certainly is not absolutely traditional. Hawken buttplates, whether an early one fabricated from sheet iron or the later bought from the East castings, were mostly straight with a square corner. There are exceptions in the later cast bought-from-the-East buttplates.
At least as far as anyone knows- that flat to the wrist trigger guard is only rarely seen on original Hawken rifles. But I love it! It makes a handsome rifle.
So what would you expect on the usual absolutely traditional Hawken rifle? You would expect very plain maple, smooth sanded but finished dark with a blackish varnish, little figure showing through. You get an octagon barrel, often tapered, sometimes slightly swamped and sometimes straight on a few, with a browned or blued finish. Likely most browned barrels were originally blued, now faded to brown, which is what antique rust bluing techniques do over time. You would see very low sights on the early guns, only the very later having higher ones, such as we moderns like to see. Only the Modena rifle has a truly high original rear sight. The front sight would have a copper base and a real silver blade, of whatever shape the last shooter left it in. I never saw an adjustable sight on a Hawken, only on the later Gemmers. You would expect a case hardened finish on buttplate, tang, breeching, lock and trigger guard. You might get a silver plated finish on the iron forend cap. All the screws would be blued, as well as the keys. Roundels could be iron or real silver, if any. (to my mind, the dull finished iron furniture went west where glint or shine in the sunlight was dangerous, the silver furniture stayed in the East where glint didn’t matter) The sidelock escutcheon could be browned or blued iron, sometimes real silver. There might be a capbox with crude engraving or the rare patchbox with none, both almost always in iron except for a few light calibered rifles obviously never meant to cross the mountains.
So what are you going to get on a modern reproduction? The real question is what errors we modern makers fabricate into our reproduction, and as an aside, what we forced to do because of concern for economy or difficulty of manufacture? First and most prominently, you will rarely ever see case hardening on a modern reproduction. If you do, it will be done with the modern gas based method rather than the heat soak in bone charcoal that the Hawkens probably used. The issue is that the colors are subtly different. Some of us substitute blued finish for case colors, but most builders just use a browned finish. Second, the barrel will inevitably be browned, not blued as were most of the originals. Third, the stock wood will be chosen for color and figure, usually will have been carved on a modern multi-place CNC carving machine to 98% shape and will be finished with modern oils and stain to enhance the figure of the wood rather than disguise it. Fourth, German Silver will be used in place of real silver. Fifth, the nose cap will rarely be silver plated. It will end up blued or browned or it will be a German silver sheet stamping. Probably most important, the furniture will be lost wax investment cast, rather than fabricated from sheet and brazed or sand cast as were the originals. All of these techniques , other than for the fancy stock, are either used to lessen costs or are simply not available to the worker.
Here is a modern copy of the Bridger Hawken. Note the browned barrel and furniture and the fancy maple stock finished to enhance the figure in the maple, the long bar adjustable rear sight and German silver surrounds on the forestock. What doesn’t show are the lost wax investment cast parts, the 5-axis CNC pantograph that carved the stock, the modern GBQ steel, the P&W automated CNC drill and rifling machine and CNC planer that made the barrel, plus all the superb modern technology that contributed to the final product. The one great thing about all this is that it makes the final product as inexpensive as it is. It means that the average shooter can afford one if he puts his mind to it. Doing it the old way, without the advantages of modern technology, would cost a fortune.
As for myself, and I am probably typical of the genre, I use the best maple I can get with the best figure simply because $100 extra for the wood will yield $300 extra on the gun. Plain maple is to be avoided except where specifically ordered. I almost always finish it with modern clear penetrating oils preceeded by Laurel Mountain stain and finally LM stock finish- which is really a very pliable varnish. I do this for a simple reason. The rifle sells better for a higher price if I do. Tradition be damned. I have found that a traditional finished stock detracts from the final price of the rifle, moderns just don’t like it. I have done a few with the blackish varnish finish, but only on special order for those who know what they want.
I also buy the best barrels I can get, machined to fit the stocks carved on a 5 place CNC auto carver, digitally fed.. I almost always finish them brown, simply because that’s what the public demands. Once in a blue moon, I get an order for a traditional rust blued one but I’m always careful to overblue it so a tinge of rust brown shows through for that worn, antique touch.
I often antique rust blue the lock, hammer, trigger guard and buttplate, but I’ve had buyers complain because they weren’t ‘correctly’ browned. I rarely case harden the same parts in color again because it adds substantially to the cost and it’s not normally profitable to do it, unless on special order. The same goes for the real silver decorations and especially the silver plated fore-stock end-cap. Most moderns prefer German silver, it’s just as pretty and far more durable with less care needed. And the real thing adds to the cost: A wax cast nose-cap costs about $10, the plating cost $40-50, the customer gets charged even more, as those base costs don’t include S&H or the time/effort to get the job done. Same goes for the front sight. German silver is stronger than the real thing and brass bases are tougher than copper, too. As an aside, nobody knows what an original Hawken front sight looked like. Most show signs of modification in their later years. Likely the Hawkens did what I do now- leave the front sight a bit high so the shooter can file it into the shape he wants when he first sights it in.
Screws, keys and small parts are most often fire blued, just like they were in the Hawken shop, but with a torch not a forge. Among the oddest complaints I’ve ever received are the ones about blue screws. Most moderns think they should be browned. Most don’t realize that many screws in those days were hand made but fire blued. Want to really jump your cost on a traditional Hawken? Just ask for hand made screws.
The oddest of all is the complaint about the curve in the buttstock. Back in the GRRW days, the Montana State Historical Society contracted for several hundred copies of the Bridger Hawken in their collection. They let us keep the original here in town for nigh onto 4 years. I carefully jotted down every detail, measuring every dimension in sight, right to the mid butt-stock being an eighth inch thicker than the buttplate. The GRRW produced rifles were very careful copies of the real thing. The complaints we got about the fat buttstock were enough to make a gunsmith cry. Note: a Hawken stock with a straight no-curve line from wrist to buttplate is WRONG!!
What does all this mean? It means that if you really want a totally traditional Hawken rifle, it will have a black varnish finished plain maple stock, a blued barrel, case colored buttplate, lock, trigger guard and breech fittings, plain low rear and copper based real silver front sight, optional real silver trim and silver plated iron nosecap, blued screws and will cost half again more than a more ordinary modern finished rifle with highly figured stock. You make the choice. It’s your money.
PS- I finally found all those precious photos I took of the Bridger Hawken back in the 1970’s. I don’t recall ever before getting them into the computer but they are now. I found them in the huge box where all those thousands of photos are that I have saved uncatalogued over the years. With any luck, I’ll have them on this website soon. DOC
PSS- I should acknowledge that there are those who might disagree with me about fit , finish and provenance as I’ve described it above. They certainly have a right to. But I protest that I have personally handled 32 original Hawkens , most of them back in the 70’s when they were cheap and could be found at gunshows and in open available collections. I took several apart and even shot several. We thought nothing of using them like any other antique back in the days when there were only antiques to shoot and only antique parts to fix them with. I can only claim a bit more exposure to the real thing than others. I fear that the real thing is so rare, that describing the genre is like a blind man groping an elephant. His description will largely depend mostly on which part he gets hold of. I fear that my perception might be likewise colored. Examining only 32 out of the hundreds that the Brothers made over the years is really not a very good sample.
DOC
CHLORATES AND BLACK POWDER SUBSTITUTES
I got a call from a fellow just the other day. He had a White rifle that he dearly loved, an old Whitetail with an early number that he had hunted with for the past 20 or so seasons. He claimed to have killed 30 plus deer with it during that time. It was super accurate and super powerful. He loved it.
Suddenly it has lost its gold plated accuracy. He took it out of for a sighting session a few days back and the less than 2 inch groups that he was used to have turned into 6 inch groups. He claimed to be using the same bullet and the same load that he always did. Had not changed a thing.
He looked down the barrel once he got it cleaned. It looked sparkling fresh, no corrosion or pits. He took it out again, but got the same results. He tried changing a few things like bullet weights and powder charges, even the kind of powder but got similar results with all them . Then he called me.
This is an awfully familiar story, one that I hear with fair frequency. Same loads, same good apparently good cleaning practices, but a sudden deterioration in accuracy. This man was even told by a gunshop that the rifling was ‘shot out’ despite the well researched knowledge that it takes on the order of 20000 shots with lead bullets to even begin to make a dent in accuracy.
The really odd thing about all this is that it never occurs if the shooter exclusively uses Black Powder. It does occur if the shooter is using the modern substitute powders. The reason is that black powder does not contain chlorates while the more modern stuff does.
The use of chlorates to enhance performance goes back more than a century. Right at the time of the Civil War in the US, a number of manufacturers experimented with chlorates in black powder. Sure enough, there was an increase in power and performance. But there was also an increase in barrel corrosion and cost. The combination did not prove to be economically viable. There were excellent grades of Black Powder available at that time at relatively cheap prices. The chlorate containing powders went nowhere.
The situation is different now. Black Powder is not expensive, in fact in most localities it’s the least expensive muzzle loading propellant available. The problem is regulation. It is a class A explosive, so transport in interstate commerce is inhibited by a plethora of rules and regulations that prevent its widespread availability. The more modern substitutes are class C propellants, slower burning and igniting at far higher temperatures. That makes them safer to transport and store, thus they are more readily available. That does not mean that they are better, only that they are easier to find and purchase.
Another factor is that their residues are even more soluble in water than black powder. They also burn more completely so are somewhat cleaner and leave less residue in the barrel after firing. All this means that they are apparently easier to clean, with companies competing for shooters dollars by advertising how few patches are required to clean a barrel after shooting their product. You would think that all the advantages lie with the new substitutes.
Unfortunately, this is not the case. Chlorates are the problem. The presence of chlorate residues in a muzzle loading or black powder cartridge barrel introduces the possibility of faster and deeper corrosion, even in stainless barrels. This not the case with Black Powder. The weak sulfuric and nitric acids that can form with the combination of black powder residues and water/water vapor are not nearly the problem that present with chlorate residues. If the least bit of water or water vapor is left in the barrel to mix with chlorate residues, hydrochloric acid will form. This acid is intensely corrosive, causing surface pitting in the best of barrel steel, including stainless. Worse, if the pitted barrel is fired, the pressure drives even more chlorate residue into the pits, which become progressively harder to clean out as they get deeper. Sooner or later, the barrel is ruined.
I see many rifles with deep chlorate pitting in the breech area. The breech is the hardest place to clean on an in-line muzzle loading rifle, thus gets the least attention. So deep pitting in this area is a common problem. It also indicates a potential problem with the barrel interior. If I get a rifle with deep pitting in the action area, I have come to count on seeing pitting in the barrel, indicating the poor cleaning practices of the owner/shooter.
If you think an in-line is tough to clean, consider a side-lock. Most side-lock shooters clean the barrel after a shooting session, but fail to clean out the breech. Cleaning out the breech on an inline is instinctive. White has always recommended that the breech plug be removed and the barrel and plug threads be cleaned thoroughly. In order to do this with a side-lock, you must remove the barrel from the stock, immerse the breech end in a bucket of cleaner and pump cleaner through the breech. If you fail to clean the breech, you are guaranteed to suffer with chlorate corrosion.
I also see a fair number of rifles that have apparently lost their gilt edge accuracy, but which have what appears to be a sparkling clean, bright , shiny barrel with no pitting. This appearance can be decidedly deceiving. Examination with a bore scope will most often show a tiny bit of surface pitting, not enough to show to the naked eye but enough to be seen with magnification. This little bit of corrosion is enough to destroy accuracy. Practically the only thing you can do about it is lap the barrel. More on that later.
What to do? Back in the bad old days, when we thought that stainless barrels would resist anything and before the truth about chlorates came out, we all thought that cleaning the barrel with wet then dry patches after every shooting session and occasionally cleaning the action was enough. Obviously, that idea came to a corroded end. This is what I do and recommend now:
Use a commercial black powder cleaner, not just soapy water. The commercial cleaners have alcohols in them, at least most do, the alcohols evaporate faster and more completely, thus get rid of water and water vapor faster/better. Cleaning up all water residues after cleaning is vitally important and alcohols help a lot. They really don’t soak the powder residues any better, nor do they slick up the barrel any better, but they do get rid of the water threat. They are also mildly alkaline which helps neutralize the acids left after firing. The best cleaner are those designed to clean stainless steel, like the stuff used in hospitals. The old White Super-Clean was merely an adaption of hospital stainless cleaner. There were three different alcohols in it, plus a spreading factor, an alkalizing agent and it dried super fast and left no water residues whatever. (That was the companies claim to fame)
Clean the entire rifle, including all parts, every time. Take the gun apart, including removing the trigger if an inline, put the small action parts in a jar of cleaner to soak while you clean the barrel with a patch. Clean the breechplug threads thoroughly. Same for the threads on the breech plug itself. Same for the interior of every part and every nook and cranny. Dry everything thoroughly. If you can, do this in an over-warm location, so drying is faster/more complete.
If the gun is a side-lock, immerse the breech end in a small bucket of cleaner and pump cleaner in and out of the barrel/breech until clean. Take the nipple out first, so the process is faster. Once the barrel is clean, dry the bore thoroughly with dry patches. Leave the nipple out so the whoosh of air in and out of the side-lock breech will dry the interior of the breech. Then follow the procedure in the next paragraph.
Once you are convinced the barrel is clean, with patches coming out without any trace of residue on them, then repeat the process. Count the number of patches it takes to get the barrel clean, then double the number and repeat the process. YOU MUST RENDER THE BARREL SPARKLING CLEAN TO KEEP ACCURACY IF USING CHLORATE CONTAINING POWDERS.
Oil everything thoroughly, inside and out. A drying, residue leaving, penetrating oil is best. Then reassemble. Pay special attention to the trigger. Any moisture left in the trigger will cause rust and lock it up. Rusty, non-functional triggers are a common problem. Use a thin, penetrating, non-gummy oil on the trigger.
Take the gun out of storage a few days later and run an oily patch down the barrel again, just to be sure. Store it in a dry place. A dehumidifier is a real help. I have one in my gun room and take special delight in how it helps.
Repeat the cleaning once a year if you don’t use the gun in the meantime.
Now, how about the gun that is already pitted. Obviously, if the pitting is severe and from one end of the barrel to the other, then nothing will save the barrel except re-rifling it or re-lining to the next larger caliber. This can be every bit as expensive as buying a new barrel, which of course is another option. If the pitting is fine, especially if it is barely visible or better yet , not visible at all, except to a magnifying bore-scope, then lapping the barrel will help. Hand lapping is a laborious, time consuming and expensive process. Fire lapping is easier and is often effective. Fire lapping cuts the cost of a fix in about half, but doesn’t always work. Neither form of lapping will restore the barrel to perfection, but both will improve it.
What really helps, in the long run, is to care for the gun as carefully as you would one of your children. Clean it thoroughly, every time, as described above, and you will be able to enjoy it for far longer than most.
Good Hunting.
DOC
PS- White Muzzleloading offers accurizing services. GoTo ‘Accurizing’, to the left in orange.
Getting ready for the hunt
Best or Worst conditions?
Most hunters and shooters like to sight in their rifles and target their guns under optimal conditions. Good weather, no wind, lots of sunshine, nice shooting bench all lead to great groups, or at least the best that one can get. Yet, when we hunt, conditions are more often than not much worse. It’s usually cold, far different than the day when we last targeted the rifle, the wind is blowing, there might be rain or snow or sleet in the air, the guide is whispering furiously in your ear, the target is moving around, sometimes vigorously trying to put distance between him and you, sometimes trying to get closer so he can stomp you in the mud, and there’s nothing pleasant or calm about the situation.
Because of that dichotomy, between the peace of sighting in and the furor of the hunt, I believe that a hunter/shooter should seek out the worst possible conditions, at least on the last time out before an important hunt ( and they are all important), anticipating that those conditions are the worst that he will have to operate within on the hunt. This does not produce optimal groups of course, but it does tell you what your personal performance will be like under the worst possible conditions. That is the performance level that should govern your personal efforts once in the field. As an ethical hunter, you should not exceed that performance parameter or you will suffer a wounded, escaped and perhaps angry animal to die a painful, lingering death or possibly cause you to do the same.
I recently finished a heavy double rifle for African shooting. (photo below) I had shot it a number of times during the regulation phase of production. Double barrels have to be ‘regulated’ with the load that the hunter will be using so that both barrels shoot into the same spot at reasonable ranges. This can turn into quite a chore as some rifles are extremely finicky about the load. Fortunately, some are not. Once the barrels are regulated, they are assembled with ribs, thimbles, sights and all permanent fixtures. Then comes the moment of truth, shooting one last time to make sure that the barrels stayed in place during the final assembly. Sometimes they don’t, then you get to start all over again.

This particular rifle was destined, at least at the outset, to put down a cape buffalo. Normally, this is a relatively close range affair, the closer the better. It’s 54 caliber bullet, weighing 750 grains, loaded over 180-200 grains of fine powder just might do the job. That bullet weight, by the way, is like shooting a 9 bore round ball gun. I chose to finish regulation of the barrels at 30 yards on a blustery day with a bit of flying rain. I also chose to shoot elbows down on hood of Suburban, no dead rest, just to see how well I could place those heavy bullets under adverse conditions.
I shot pairs of bullets, left and right, that’s rear trigger then front trigger, with charges of Pyrodex P from 160 to 200 grains. I did not clean between shots, just as you would not in the field, and loaded from the pouch, so to speak, although on this occasion it was really from the pocket, with powder flask and bullets in opposite side pockets of my shooting jacket. The capper was slung around my neck, duplicating hunting practice.
Here’s the target I shot
The point of aim was at 6 o’clock on the orange bull, the group in general striking right at point of aim. The front bead was almost as large as the orange bull. The 160 grain load suffered a ‘called out’ shot with the left barrel, a gust of wind catching me just as the rifle fired, throwing the bullet up and left. The right barrel is on the money at 6 o’clock in the bull’s orange 8 ring along with bullets from the 170 and 200 grain loads. The 170 grain load put the left barrel into that same group, with the right barrel placing the bullet to the right by an inch and a half. That bullet hole is not marked. Sorry. The 180 grain load, shot during a lull in the weathers windy festivities, put both left and right bullets on a parallel and an inch apart and about an inch and a half low below the orange 6 o’clock. I decided to shoot the 190 grain load as a true double, damn the wind, and pulled the shots off within a second, with a two inch dispersion left to right. I did the same with the 200 grain load with the dispersion vertical but the bullets on the correct sides, left and right.
You might think that the 180 grain load was the best, but remember that it was shot deliberately while the others were shot as if the buffalo was coming fast and damn close. The fact is that all the shots, with perhaps the exception of the first 160 grain ‘called out’ shot, would have killed the buffalo, or at least slowed him down.

